How To Fix A Stiff Faucet Handle

A disobedient faucet handle that becomes stiff and hard to turn can quickly become a problem. Fixing a stubborn faucet handle is something you need to do early on because it can get stuck and prevent you from getting water. Whether the faucet is in your kitchen or bathroom, a stuck faucet can quickly become a problem.
Fortunately, repairing the handle shouldn’t be difficult. All you need are a few tools, a chunk of time, and the will to fix it. Read on for a guide on how to fix a faulty faucet.
Why Is The Faucet Handle Hard To Turn?
There are several reasons why faucet handles can be difficult to turn. One of the main culprits is mineral deposits that build up and start causing problems. Another possible cause is the spool of the faucet, which eventually develops problems and makes the faucet handle difficult to turn.
Whether you are dealing with a single-handle faucet or one with a set of handles, solving this problem is not too complicated.
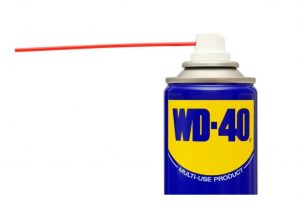
Can You Use WD-40 On A Faucet?
Yes, you can try WD40 on a faucet. In this case, if the faucet handle does not want to turn, try using a little WD-40 and see if that solves the problem. WD-40 will help lubricate the faucet handle and hopefully encourage it to move. This may help loosen the handle and make it more fluid and easier to turn.
If this doesn’t help, try loosening the screws on the handle slightly. If you’ve recently been tinkering with your faucet, either repairing parts or looking for a brand, you may have overtightened the screws. Overtightened screws may restrict the movement of the handle.
How Do I Loosen A Stiff Faucet Handle?
Loosening a stiff faucet handle takes a little time, but it’s not hard to do. First, you need to inspect the inside of the faucet to confirm the problem. From there, you can determine the best course of action.
As with any other project that involves removing the faucet, you will need to turn off the water to the faucet. The shut-off valve may be under the sink, but if your faucet is not equipped with a local valve, you may need to turn off the shut-off valve to the main water supply. Check that the water has been turned off by opening the faucet and making sure no water is flowing.
What You Will Need
- Philips-headed screwdriver or Allen wrench
- Flat-head screwdriver
- Adjustable wrench
- Pliers
- Replacement cartridges (if needed)
- Towel
Gather all necessary materials and make sure the water is turned off. Place a towel over the drain so you don’t lose any parts, then you can go ahead and remove the stubborn faucet handle. Next, remove the set screw that holds the handle in place. This screw may be located on the bottom or side of the faucet.
Some models of faucets may have a decorative cover that hides the screw. In this case, you just need to open the cover of the faucet and find the screw.
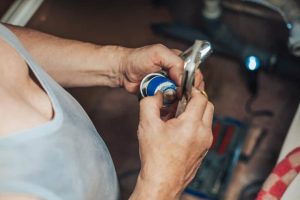
Use your screwdriver or allen wrench to remove the screw, then remove the handle. In some cases, there are no screws on the handle, so you only need to twist the handle hub to remove it. Once the handle is removed, you will find a large nut on the faucet valve. Use an adjustable wrench to remove this nut.
Before you remove the spool from the faucet body, note the orientation of the spool. If you need to, take a picture of the orientation before you remove it. To remove the spool, grip the spool with a pair of pliers and pull it straight up. Some brands require a unique tool called a cartridge puller. If this is the case, look up the brand name and find the correct device.
Cleaning The Cartridge
In the next steps, you will need.
- Vinegar
- Steel wire brush
- Replacement parts (if necessary)
Once you have removed the cartridge, check it carefully for corrosion. If you find any corrosion or rust, try using a wire brush to clean the faucet valve. White vinegar can also help unstick and remove any rust. If the damage looks fairly extensive, it’s a good idea to purchase a replacement part.
When purchasing a replacement cartridge, bring the old one with you when you shop to make sure you choose the correct model.
Now that you’ve disassembled the faucet, you may want to scrub the rust off the other faucet parts. While the cartridge is usually the culprit when it comes to hard-to-turn faucet handles, it doesn’t hurt too deep clean the rest of the faucet.
Putting It All Together
Once you’ve cleaned the cartridge or purchased a new one if necessary, you’ll need to reinstall each part. Replace the cartridge in the same direction as before. Tighten the nut, then replace the faucet handle.
Tighten the screws holding the handle in place and then check the handle. The handle should move properly and you can now turn on the water supply again and get on with your day.