How To Remove A Rusty Kitchen Faucet Nut
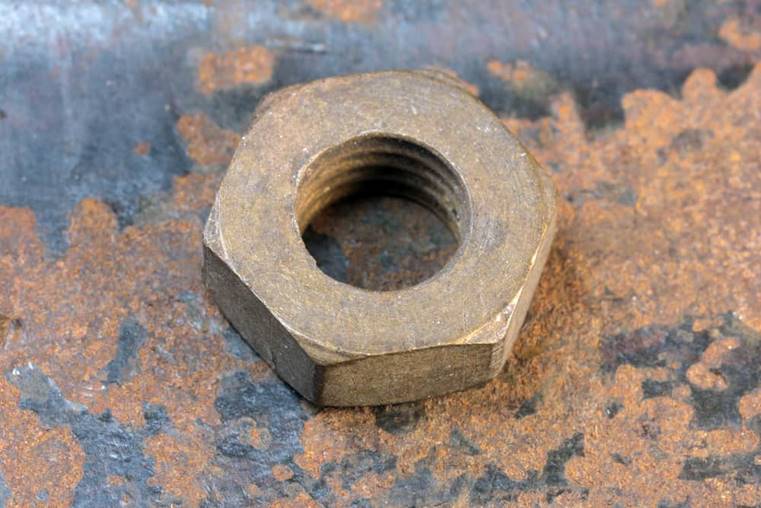
Over time, the locking nut that holds the faucet to the countertop may freeze in place, causing problems when you try to remove it. When this happens, it’s usually the result of corrosion or mineral buildup after years of water immersion.
Fortunately, the frustrating pause in your plumbing project can be repaired and get you on your way right away. If you’re at a loss on how to remove a rusty kitchen faucet nut, read on to learn more.
What Causes Kitchen Faucet Nuts to Freeze?
Generally speaking, when a kitchen faucet nut becomes frozen in place, there are several major causes of the problem. Most commonly, the culprit is water exposure over the years. Typically, you won’t find a stuck faucet nut on a new faucet unless you screw it on too tightly (which is a nightmare in itself).
Water exposure from a slow leak or seepage can cause corrosion or mineral buildup on and around the nut, holding it in place. You have several options for breaking the adhesive that holds the faucet nut in place. Fortunately, these methods are far from difficult (although some are quite time-consuming).
How To Remove A Rusty Kitchen Faucet Nut

There are various methods you can use to remove the rusty faucet nuts that hold your faucet in place. However, it’s important to note that some of these methods can damage the nut. If you use the harsher methods, you may need to replace the faucet nut.
If you are simply removing an old, faulty faucet, damaging the faucet nut may not be a concern for you. Now, if you are removing a faucet nut from a faucet that has just been repaired, you may need a replacement faucet nut once you have removed the current corroded faucet nut.
Now that we know the possible outcomes, let’s talk about solutions. Here are a few options for removing a faucet nut.
Tighten The Nut
Yes, this method seems too counter-intuitive, we know. However, in this case, even turning the nut in the wrong direction can be beneficial, so try to tighten the nut as much as possible. Movement can help break the adhesive that holds the faucet nut in place. If you can’t get a good grip with a wrench, use a face wrench or a pair of pliers.
If you can tighten it slightly, proceed to try to unscrew it. If you’ve broken the bond, it may loosen up and get you on your way sooner than expected.
Use A Hammer

If tightening the nut proves ineffective, try using a hammer. The goal remains the same: to break the corrosion holding the nut in place. Sometimes, hitting the nut with a hammer can give it a solid bump and release the bond.
Make sure you are hitting the nut itself, not the surrounding threads. If you’re a little skeptical of your goal, use a center punch on the nut and tap the punch with a hammer. If it doesn’t seem to listen, try to loosen it.
Use A Wire Brush
Warner 5×11 Row, Stainless Steel Stripping Brush, 3410493

- Wide stainless steel stripping brush for removing rust and corrosion
- Can be used safely with paint strippers
- Stainless steel bristles prevent rusting
- Handle made of soft-grip polypropylene and thermoplastic rubber (TPR)
If it’s painted with orange stripes, try using a wire brush to brush off the rust. This method is very straightforward: remove as much corrosion as possible with a wire brush. Make sure you scrape off the corrosion at all the faucet joints as well. If there is no corrosion covering the joints, you may be able to remove the faucet nuts.
Use Heat
Heat can be a useful tool when battling stubborn faucet nuts. If you have tried the above methods and nothing seems to work, try using heat. Using a hairdryer, heat the corroded metal.
The application of heat can help break up the adhesive that is causing the corrosion. You can also use a propane torch or heat gun if you don’t have a hairdryer on hand, but be careful if you choose something with an open flame.
To make sure you don’t start a bonfire in your kitchen cabinets, cover all flammable surrounding parts with fire retardant fabric before using an open flame. If using heat doesn’t sound like an approachable solution, skip to the next option.
Use Penetrating Oil
Free All Rust Eater Deep Penetrating Oil, 11 oz Aeroso

- Penetrates rust, scale and corrosion, releasing parts and components immediately
- Loosens red and white lead, tar, grease, carbon and graphite deposits
- Releases all threaded pipe joints, rusted machine screws, bolts, nuts, muffler clips ……
- Silicone-free and safe in paint and shop environments
If nothing else helps, penetrating oil may do the trick. Apply a moderate amount of penetrating oil to the nut. This should help loosen the nut and dissolve the adhesive holding it in place.
Make sure you apply it properly to all corroded joints. In some cases, you may need to let it soak for a few hours. It may also need to be used a few times to see if it helps.
Once the faucet nut has been soaking for a while, take a wire brush and scrub the corroded areas to remove the nut. After removing the nut, brush off any excess corrosion. You can soak the nut in white vinegar to help dissolve any remaining corrosion.
If the nut on the faucet is badly damaged, it is best to replace it rather than use the old one. In addition, it is vital that you do not use penetrating oils and heat at the same time. Some penetrating oils are highly flammable, which means you are much more likely to be able to roast marshmallows under the kitchen sink.
If you decide to try heating again after using penetrating oils, make sure you clean all the oil off before you start. Use a water-based cleanser to remove the oil before attempting to heat it up again.
Use An Acid-Based Cleaner
Try using an acid-based cleaner. Before using it, clean off any mineral deposits and then apply the cleaner around the stuck nut with a rag dipped in the cleaner. Let it soak for a few minutes, then scrub the area with a wire brush.
Wipe up any remaining residue with a rag, then reapply the acid-based cleaner. Let it soak for about 24 hours. After letting the area soak for a while, try to remove the nut with a wrench.
WONDERFUL Post.thanks for share..extra wait .. …
https://www.zoritolerimol.com