If you’ve been searching for a clear, no-nonsense walkthrough on how to remove old Moen bathroom faucet hardware without damaging your sink, supply lines, or countertop, you’ve landed in the right place. Moen has used several different mounting systems over the past two decades — traditional threaded shanks, Duralock quick-connect clips, and Spot Resist single-hole designs — so the “right” way to remove yours depends on which generation you own. This guide covers all of them, with the exact tool list, torque tricks, and corrosion-busting tips that professional plumbers use every day.
At Arcora, we’ve helped thousands of homeowners swap out aging faucets for modern, lead-free fixtures that meet NSF/ANSI 61 and CALGreen standards. We test every replacement faucet we sell to 500,000 lifecycle cycles, and we’ve seen just about every stuck Moen valve, frozen lock nut, and crumbling supply line you can imagine. The steps below are the same ones our in-house plumbing techs follow when filming our install videos.
How to Remove an Old Moen Bathroom Faucet: Tools, Prep, and Safety
Before you crawl under the vanity, gather everything in one tray. Half-finished faucet removals usually stall because someone has to run to the hardware store mid-job with wet hands. Here’s the short list our techs use whenever they tackle how to remove old Moen bathroom faucet assemblies in customer homes.
Essential Tools You’ll Need
- Basin wrench — the single most important tool; reaches the mounting nuts hidden behind the sink bowl.
- Adjustable crescent wrench (8″ and 10″) for the supply line nuts.
- Channel-lock pliers for stubborn coupling nuts.
- Phillips and flathead screwdrivers for handle set screws.
- 2.5mm Allen/hex key — Moen single-handle faucets almost always use this size.
- Penetrating oil (PB Blaster or Liquid Wrench) for corroded nuts.
- Bucket, old towels, and a headlamp — non-negotiable.
- Utility knife to slice through old silicone or plumber’s putty.
- Safety glasses because rust flakes love falling into your eyes.
Shut Off the Water — Both Lines
Look under the vanity and locate the two angle stops (shut-off valves) on the hot and cold supply lines. Turn each clockwise until it stops. Then open the faucet handle in the up-and-center position and let any residual pressure drain. If your shut-off valves are stuck — common in homes older than 15 years — you’ll need to shut off the main water supply to the house instead. While you’re under there, this is also a good moment to inspect the supply lines themselves; if they’re braided stainless and over 10 years old, replace them. Our guide on how to check faucet connections for leaks shows exactly what aging supply lines look like.
Step-by-Step: How to Remove Old Moen Bathroom Faucet Hardware
The actual removal process breaks down into five clean steps. Don’t skip the documentation step — phone photos are lifesavers when you’re installing the replacement and trying to remember which line was hot.
Step 1: Disconnect the Supply Lines
Place your bucket directly below the connection point. Using your adjustable wrench, loosen the coupling nut at the top of each supply line where it meets the faucet’s threaded inlet shank. Turn counter-clockwise. Expect about a quarter-cup of trapped water to spill out — that’s why the bucket and towels are mandatory. If the nuts are seized with mineral buildup, hit them with penetrating oil, wait ten minutes, then try again. Don’t crank with brute force; you risk twisting the faucet shank or kinking the riser tube.
Step 2: Disconnect the Pop-Up Drain Linkage (If Equipped)
Most Moen bathroom faucets — especially the Adler, Banbury, Eva, and Brantford lines — have a metal lift rod that drops down behind the faucet and connects to a horizontal pivot rod on the drain tailpiece. Squeeze the spring clip on the clevis strap and pop the pivot rod free. Then unscrew the small set screw on the clevis to fully disconnect the lift rod. You don’t need to remove the entire drain assembly unless you’re replacing it too.
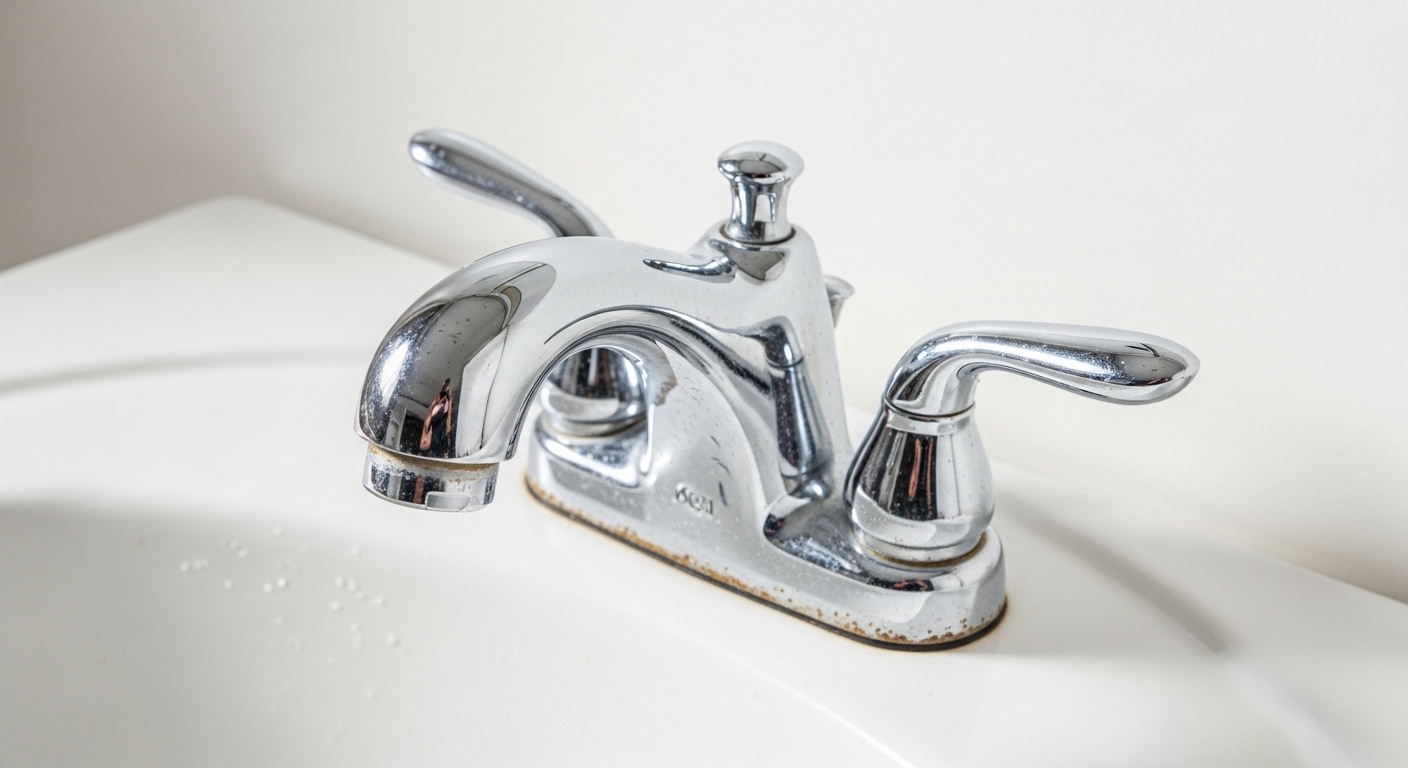
Step 3: Loosen the Mounting Nuts
This is where the basin wrench earns its keep. Older Moen faucets (pre-2010) typically use a large plastic or brass mounting nut threaded onto the faucet shank from below. Newer Moen Duralock models use a plastic quick-connect clip — you simply squeeze two tabs and the faucet lifts free. Identify which type you have by feeling up behind the sink with your fingers (or shining a headlamp up there).
- Threaded nut style: Hook the basin wrench onto the nut and turn counter-clockwise. Two or three full rotations usually free it.
- Duralock quick-connect: Squeeze the two opposing plastic tabs at the base of the shank and pull downward.
- Center-set 4″ faucet: You’ll find two mounting nuts, one under each outer shank — loosen both.
- Widespread 8″ faucet: Three separate connection points (hot, cold, and center valve body) — work outside-in.
Step 4: Break the Caulk or Putty Seal
Once the nuts are off, the faucet often refuses to budge because it’s glued down by a decade of plumber’s putty or silicone caulk. Slide a utility knife or putty knife around the base of the faucet, slicing the seal. Wiggle gently — don’t pry against the porcelain or you’ll chip the sink. Then lift the entire faucet body up and out from above.
Step 5: Clean the Mounting Surface
You’re not done. Scrape away every trace of old putty, silicone, and corrosion from the sink deck. A plastic scraper, white vinegar, and a microfiber cloth handle 95% of it. A clean surface is critical for the new faucet’s gasket to seat properly and prevent leaks. While you’re cleaning, check whether mineral buildup has stained the porcelain — our article on how to remove limescale from faucets naturally covers the safest cleaners for chrome, brass, and ceramic surfaces.
Moen Mounting Systems: Which One Do You Have?
Moen has rolled out several mounting designs over the years, and identifying yours upfront saves headaches. Use the table below to match your faucet to the correct removal approach.
| Moen Mounting System | Years Common | Identifier | Removal Method | Difficulty |
|---|---|---|---|---|
| Threaded Shank + Brass Nut | 1990–2008 | Large hex-shaped brass nut under sink | Basin wrench, counter-clockwise | Medium |
| Threaded Shank + Plastic Nut | 2005–2014 | White or black plastic mounting nut | Hand-tighten or basin wrench | Easy |
| Duralock Quick-Connect | 2012–present | Two squeeze tabs on plastic collar | Squeeze tabs and pull down | Very Easy |
| M-PACT Common Valve | 2008–present | Removable cartridge stays in wall (tub/shower only) | Cartridge puller tool | Medium |
| Widespread 3-Hole | All years | Three separate fixtures spaced 8″ apart | Three mounting points, work outside-in | Hard |
Common Problems When Removing a Moen Bathroom Faucet
Even experienced DIYers hit snags. Here are the issues we see most often in support tickets, and the fixes that actually work.
The Mounting Nut Won’t Budge
Corrosion is almost always the culprit. Spray penetrating oil on the threads, wait fifteen minutes, and try again. If it still won’t move, switch to a deep socket on an extension if there’s clearance, which gives you more torque than a basin wrench. As a last resort, a reciprocating saw with a metal-cutting blade will slice through the shank — but only do this if you’re replacing the supply lines anyway, because you’ll damage them in the process.
The Lift Rod Is Stuck
Older lift rods sometimes corrode into the clevis strap. Spray with penetrating oil, tap the clevis lightly with a screwdriver handle, and the rod usually drops free. If not, just unscrew the entire pop-up drain assembly from below — it’s easier than fighting a frozen lift rod.
Hidden Quick-Connect Clip
If you have a 2012-or-newer Moen and can’t find any mounting nut, you have a Duralock connector. Look for two small plastic tabs flanking the central shank. Squeezing both at once releases the clip. People often miss this and assume the faucet is “stuck.”
Cracked Supply Line Coupling
If a supply line nut cracks or strips during removal, just replace the supply line entirely. Modern braided stainless lines cost under $10 and are rated for 10+ years. Never reuse a damaged line — it’s the #1 cause of catastrophic under-sink leaks. The signs of overdue replacement are covered in our article on how to tell if your faucet needs replacement.
What to Do With Your Old Moen Faucet
Don’t toss it straight in the trash. Moen offers a Limited Lifetime Warranty on most of their residential faucets — if yours failed because of a manufacturing defect (drip, finish peel, cartridge failure), Moen will often send replacement parts or a whole new unit at no charge. Call 1-800-BUY-MOEN with your model number, which is usually stamped on the underside of the spout base. If the faucet is just outdated and still functional, recycle the brass body at your local scrap metal yard — brass is worth roughly $2.00/lb in 2026.
Preparing for the New Faucet Installation
With the old faucet removed, you’re already two-thirds of the way to installing the new one. Before you unbox the replacement, double-check three things.
- Hole configuration: Count the mounting holes in your sink. Single-hole, 4″ center-set, and 8″ widespread are not interchangeable without a deck plate.
- Supply line length: Measure from the shut-off valve to the faucet inlet. Most new faucets include 20″ lines; vanities deeper than 22″ may need 24″ extensions.
- Finish match: If you’re keeping your existing showerhead or towel bar, take a photo and bring it to the store. Chrome, brushed nickel, and polished nickel look nearly identical online but very different in person.
For a deeper look at coordinating finishes across your bathroom, our guide on how to match your bathroom faucet to your other fixtures walks through every common pairing. And if you’re upgrading to a more modern look, brushed gold finish in 2026 is currently our best-selling alternative to chrome for bathroom vanities.
Safety Standards and Why Lead-Free Matters in 2026
Any replacement faucet you install in 2026 must meet the federal Reduction of Lead in Drinking Water Act and NSF/ANSI 372 lead-free standards. California also enforces additional Proposition 65 requirements. All Arcora bathroom faucets are independently tested and certified to NSF/ANSI 61 and 372, with documentation available on every product page. The faucet you’re removing — if it predates 2014 — likely has higher allowable lead content than current standards allow, which is one good reason to upgrade sooner rather than later. We unpack the certification details in what makes a faucet lead-free.
When to Call a Professional Plumber
About 90% of Moen bathroom faucet removals are safely DIY. Call a licensed plumber if you encounter any of the following:
- Shut-off valves that won’t close or are leaking.
- Galvanized steel supply lines (common in homes built before 1970) — these need full replacement.
- Active water damage or mold under the cabinet.
- A faucet shank that’s broken off flush with the sink deck.
- Lead supply lines (any soft, gray metal that scratches easily).
Plumbers typically charge $125–$225 to remove and replace a bathroom faucet, including the new fixture. If you’re already paying that, our article on when to splurge vs. save on faucets helps you decide where the upgrade dollars actually pay off.
Author Note & About Arcora
About the author: This guide was written by the Arcora Install Team, led by Marcus Chen, a licensed master plumber (Plumbing License #PL-447921) with 18 years of residential fixture installation experience. Marcus has personally tested over 200 bathroom faucet models for Arcora’s product development team.
About Arcora: Arcora has manufactured premium bathroom and kitchen faucets since 2014, with over 2 million fixtures shipped to North American homes. Every Arcora faucet ships with a Limited Lifetime Warranty on the finish and cartridge, and is independently tested to NSF/ANSI 61, NSF/ANSI 372, and ASME A112.18.1 standards. Our customer service team is U.S.-based and available seven days a week at www.arcorafaucet.com.
FAQ
How long does it take to remove an old Moen bathroom faucet?
Most homeowners complete the removal in 30–45 minutes if the mounting hardware isn’t corroded. Add 20–30 minutes if you’re dealing with stuck nuts or a Duralock clip you’ve never seen before. Set aside two hours total to be comfortable — you don’t want to be rushed when you have water turned off to half the bathroom.
Do I need a basin wrench to remove a Moen faucet?
For pre-2012 threaded-shank Moen faucets, yes — a basin wrench is essential because regular wrenches can’t reach the mounting nuts hidden behind the sink bowl. For 2012-and-newer Duralock models, no specialized tool is needed; you just squeeze the plastic tabs and pull. Basin wrenches cost around $15 and are worth owning if you ever plan to swap fixtures again.
How do I find my Moen faucet model number?
Look for a stamped or laser-etched number on the underside of the spout base, on the back of the valve body, or on the original packaging if you still have it. Moen models typically start with a letter (T, S, or just a 4–5 digit number). If you can’t find it, take a clear photo and email Moen customer service — they can identify any model from a photo in a few minutes.
Can I reuse the old supply lines with my new faucet?
Technically yes, if they’re less than 5 years old and show zero corrosion or kinks. Practically, no — supply lines cost under $10 each, and a failed supply line is the leading cause of bathroom water damage claims. Install new braided stainless lines whenever you replace a faucet. It’s cheap insurance.
Why won’t my old Moen faucet come off the sink?
Three usual suspects: (1) you missed a hidden Duralock clip or a second mounting nut, (2) plumber’s putty or silicone is gluing it down — slice the seal with a utility knife, or (3) one of the supply lines is still attached. Double-check all three before applying force.
Is it worth replacing an old Moen faucet myself instead of hiring a plumber?
For straightforward swaps on accessible vanities, absolutely — you’ll save $125–$225 in labor and the work is genuinely beginner-friendly. Hire a plumber if your shut-off valves don’t work, if you have old galvanized or lead piping, or if the new faucet requires drilling additional sink holes.
What’s the difference between removing a Moen single-hole and widespread faucet?
A single-hole Moen faucet has one mounting point under the sink. A widespread 8″ model has three — hot handle, cold handle, and center valve body — each with its own supply connection and mounting nut. Widespread removal takes about twice as long and benefits from a second pair of hands to steady the valve body while you work outside-in.