How To Tighten A Loose Moen Bathroom Faucet Base

Over time, the base of your Moen bathroom faucet may become loose, causing the entire faucet to turn or wobble. Loose faucet bases can also lead to unwanted problems, such as water seeping out near the faucet base. The faucet in your bathroom is an important fixture that can create problems when it decides to become loose or leak.
Fortunately, the fix is simple and shouldn’t take long. Continue reading for a quick guide on how to tighten a loose Moen bathroom faucet base.
Moen Bathroom Faucet Types
Moen offers many different styles and designs of bathroom faucets. There are two-handle faucets and single-handle faucets. Some two-handle faucets are center-mounted, meaning that the handle and faucet spout are attached to a base plate.
For example, the Moen 4570 bathroom faucet is a common choice that features handles set a short distance apart on either side of the faucet body.
On the other hand, Moen has also developed single-handle, single-hole bathroom faucets that have only one point of contact with the countertop. Fixing the loose base of a faucet depends on the type of faucet you have.
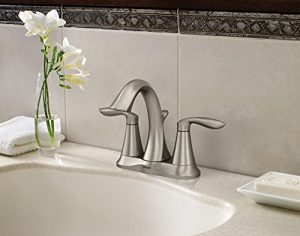
Moen’s two-handle, overhead lavatory faucet is a common choice. The entire unit sits on an interconnected base plate, making the tightening process easy. For this process, you will need
- Basin wrench
- Adjustable wrench
- Gloves (optional)
- Towel
Clean out the cabinets
First, clean out the cabinets under the sink (if applicable). The space under most sinks is already tight enough, so removing all items from that area will give you as much room to work as possible.
Turn off the water supply

Then, turn off the water supply to the faucet you are working on. There should be a stop valve under the sink itself. If not, you may have to shut off the main water supply to the entire house. If you have to resort to the main shut-off valve, be sure to let everyone know that you are turning off the water.
Open the faucet handle and drain any excess water from the water supply line. This will also help release any residual pressure. Once you have confirmed that the water supply line is empty, continue with the process.
Remove The Water Supply Line
Locate the faucet base under the sink. Use an adjustable wrench to remove the water supply line from the faucet base. This will give you extra space to work with, which is helpful considering how restricted the space is near the faucet base. You can wear gloves to protect your hands if you wish. Use a towel to soak up any water droplets.
Tighten The Screw Cap
Now that the water supply line has been removed, use a face wrench to hold the loose nut that holds the faucet base to the sink. Once you have a good grip, apply gradual pressure to tighten each loose nut on the bottom of the basin. Typically, there are two nuts holding the faucet in place on a mid-mount Moen bathroom faucet.
Check Your Work
After tightening the loose nuts, check the base of the sink above the countertop to make sure it is snug in place. Reconnect the water supply line, then turn on the water supply. Check for leaks near the base. If everything looks good, you’re done!
Single Handle Single Hole Bathroom Faucet
Moen Single Handle Single Hole Lavatory Faucets are easy to install, uninstall and fasten. These faucets are held in place by a crescent-shaped mounting bracket with an integrated elastomer washer. The mounting bracket rests snugly on a threaded rod at the bottom of the deck. A mounting sleeve is easily threaded onto the rod to hold the bracket in place.
Moen Mounting Tool
Moen has developed a specific mounting tool to access the mounting sleeve, which is, of course, only available through them. The mounting device looks like a long, hollow tube with a hexagonal opening that fits around the mounting sleeve.
While it is easy to use and makes the process of installing and tightening the sink quick, you may not have this particular tool. A basin wrench should also make tightening the mounting sleeve quick.
Gather Your Materials
Given the simplicity of the mounting system, tightening the faucet is quick and easy. Here are the materials you will need to tighten the mounting sleeve
- Installation tool or basin wrench
Cut Off The Water Supply
As with any plumbing project, start by turning off the water supply to the sink. You may not need to remove the water supply line because the process is simple. However, if space is tight and you can’t reach the threaded rod, then go ahead and remove the water supply line.
Remove The Water Supply Line
Follow the procedure we outlined above: turn off the water supply, drain the pressure in the line by opening the faucet, and disconnect the water supply line from the faucet base under the deck.
Tighten The Mounting Sleeve
To tighten the installation sleeve, place the installation tool over the threaded rod. Rotate the tool and tighten the sleeve. If the mounting bracket slips, push it onto the threaded rod until it rests snugly on the sink deck. Then, tighten the mounting sleeve. If you don’t have the specific installation tool necessary, a basin wrench will work.
Loose Moen Bathroom Faucet Handle

Loose handles are another common problem with faucets. Fixing a loose handle may be as simple as tightening the screw that holds the handle in place. To tighten the handle, you’ll need to find the screw that tightens the handle and then use a screwdriver to tighten it.
Of course, this process varies slightly depending on the type of faucet you have. For example, if you have an extensive Moen faucet, the handles themselves will be unscrewed.
To remove them, you simply turn the entire handle clockwise and it will come right off. Since the handle is not screwed on, check the ring in the middle. If it wobbles, you’ll need to tighten the screw with a Phillips screwdriver.