Moen Single Handle Kitchen Faucet Troubleshooting Repair Guide

Perhaps you’ve started a plumbing project involving the removal of a Moen single-lever kitchen faucet. The project was supposed to take a half-hour at most, and you’ve spent hours on it. Or, maybe you need to disassemble the faucet but have absolutely no idea where to start.
Either way, it can be frustrating, especially when a quick fix magically turns into a day-long affair. Fortunately, we’re here to help. So if you’re in a bind trying to disassemble (or reassemble) your Moen Single Handle Kitchen Faucet, you’re in the right place.
Moen Faucet Parts
All faucets are slightly different, but they have the same basic components. We have found that it can be helpful to know what each of these small parts is and where it fits in the grand scheme of things. This is where the Moen kitchen faucet repair diagram comes in handy.
Universal Body Diagram
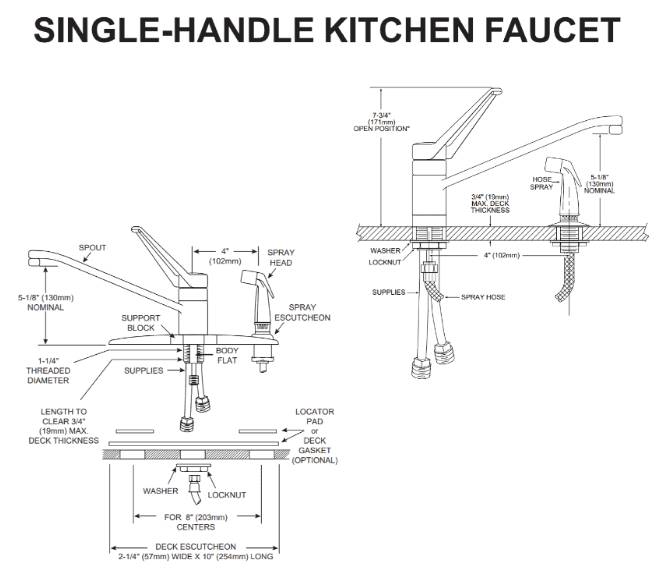
Moen provides installation instructions with its kitchen faucets. To get a general overview of Moen’s single-lever kitchen faucets, let’s take a look at the attached pictures of the Model 7200 series kitchen faucets.
Let’s start with the picture that isolates the faucet’s setup from the under-counter accessories. If you look in the middle, you’ll see the support block. This is the basement where your kitchen faucet sits above the countertop. Anything above it is visible; anything below it is under the countertop.
Obviously, the spout, handlebar and spray head are located above the countertop. Underneath the nozzle, you’ll also see the shroud. These are the generic parts that most of us think of when we consider a faucet.
Now, move under the support block and look at the components hidden under the countertop. You’ll see the water supply line that connects to the water supply line, as well as the spray hose. A deck gasket organizes the hose.
You will see the diameter of the threads located in the plane of the fuselage under the support block. These are helpful for measuring the deck thickness. Also, below the deck surface, there is a washer and a lock nut.
These charts provide specific measurements and are important points of information that are critical to proper assembly. These measurements include.
- Distance from spout head to base. 130 mm
- Distance from spout base to spray base. 102 mm
- Distance from base to top of the handle. 171mm
- Maximum deck thickness: 19mm
Parts Inside The Faucet
Within the faucet itself, there are various small parts, each of which is vital to the proper function of the faucet. This diagram provides us with a breakdown of these parts. The diagram shows where each part is located in the assembly.
If you completely disassemble the faucet itself, you may find this diagram a useful tool to organize the parts in order of their location. Generally, you will need to partially or completely disassemble the faucet to replace the cartridge or O-ring.
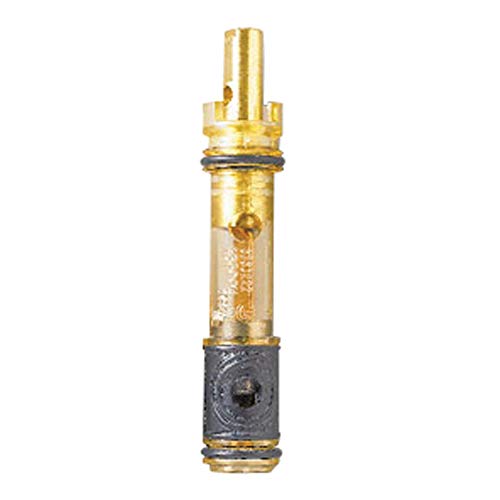
Cartridge Diagram
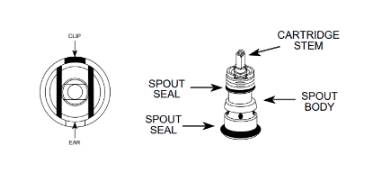
The cartridge is an important part of Moen’s single-handle faucet. You’ll find it under the handle, hidden inside the faucet. Its role in the faucet is to regulate the flow of water. It seals the flow of water and prevents it from leaking out when the faucet is closed. If your faucet is leaking, the cartridge may be the culprit.
The cartridge assembly has two parts: the valve body and the spout body. The valve body is located above the spout body and acts as a seal. The cartridge stem is the main part of the cartridge as it is where the water originates from.
Other parts within the cartridge assembly include the spout seals as well as the clips and sleeve lugs.
How To Disassemble A Moen Single Handle Kitchen Faucet
If you haven’t already taken the faucet apart, use this guide. If you have already taken it apart, skip to the next section for detailed instructions on reassembling each component. As with any plumbing project, start by turning off the hot and cold water supply lines under the sink.
Some sinks do not have an isolated shut-off valve specifically for the sink. In this case, you must shut off the water supply to the entire house. Be sure to warn your family so there are no surprises (oops, someone is trapped in the shower).
Once you have shut off the water to the sink or the entire house, drain the water from both water supply lines. Release the pressure by opening the faucets to make sure the water is completely shut off and that there is no water in the pipes waiting to give you a temporary shower.
Here’s what you’ll need for this project
- A flat-head tool of your choice
- Philips screwdriver
- Moen spool unscrewing tool or Moen spool puller
- A pair of pliers
- Allen wrench
- Replacement parts (if necessary)
Cover the drain with a small towel to prevent any parts from leaking into the drain. Next, take a flat-bladed tool and carefully pry off the handle cover. Using a Philips screwdriver, remove the handle screws. Lift the handle up and remove it.
With the handle out of the way, remove the collar and swivel retainer. Next, unscrew the retainer nut and thrust washer and remove both. Using a screwdriver, pry out the cartridge clips.
Moen has a special cartridge twisting tool that you can use to complete the next step. Otherwise, you can use Moen’s cartridge extractor. Using the tool of choice, twist the cartridge housing back and forth to loosen it. Once it is loose and movable, use a pair of pliers to grip the cartridge and pull it up and out of the faucet body.
Now that the main part of the faucet is complete, you can complete any necessary repairs or replacements. To reassemble the faucet, go back through these steps or skip to the next section where we will explain in detail.
Reassembling the Moen Single Handle Kitchen Faucet
If you have already disassembled the faucet and are overwhelmed by the task of reassembly, we are here to help. So instead of carefully going back through the detailed disassembly process, we outlined above, we’ll review each step of putting the faucet back together.
Before you begin, make sure all the necessary parts are in easy reach. First, align the ears of the spool sleeve with the slots in the valve body from front to back. Then, with the stem facing up, insert it into the assembly, pressing firmly on the top of the stem sleeve ears.
Next, reinstall the cartridge clamp, along with the retainer nut and thrust washer. Replace the pivot retainer, taking care to orient the notch toward the back of the faucet. Put the collar back in place and hand tightens it until it is snug.
Hook the handle tab into the groove of the pivot retainer, making sure the stem groove is facing forward. Carefully align the handle fitting with the stem, then gently push the handle onto the stem.
Screw on the handle screw and press on the handle cover. Once the faucet is back in place, reinstall the faucet, secure it to the countertop, and reconnect the water supply line (if applicable). After everything is connected and in its proper place, turn on the water supply and check your handiwork.
Regardless if you believe in God or not, this is a “must-read” message!!
All throughout time, we can see how we have been carefully conditioned coming to this point where we are on the verge of a cashless society. Did you know that the Bible foretold of this event almost 2,000 years ago?
In the book of Revelation 13:16-18, it states,
“He (the false prophet who deceives many by his miracles–Revelation 19:20) causes all, both small and great, rich and poor, free and slave, to receive a mark on their right hand or on their foreheads, and that no one may buy or sell except one who has the mark or the name of the beast, or the number of his name.
Here is wisdom. Let him who has understanding calculate the number of the beast, for it is the number of a man: His number is 666.”
Referring to the last generation, this could only be speaking of a cashless society. Why’s that? Revelation 13:17 states that we cannot buy or sell unless we receive the mark of the beast. If physical money was still in use, we could buy or sell with one another without receiving the mark. This would contradict scripture that states we need the mark to buy or sell!
These verses could not be referring to something purely spiritual as scripture references two physical locations (our right hand or forehead) stating the mark will be on one “OR” the other. If this mark was purely spiritual, it would indicate both places, or one–not one OR the other!
This is where it really starts to come together. It is amazing how accurate the Bible is concerning the implantable RFID microchip. These are notes from a man named Carl Sanders who worked with a team of engineers to help develop this RFID chip:
“Carl Sanders sat in seventeen New World Order meetings with heads-of-state officials such as Henry Kissinger and Bob Gates of the C.I.A. to discuss plans on how to bring about this one-world system. The government commissioned Carl Sanders to design a microchip for identifying and controlling the peoples of the world—a microchip that could be inserted under the skin with a hypodermic needle (a quick, convenient method that would be gradually accepted by society).
Carl Sanders, with a team of engineers behind him, with U.S. grant monies supplied by tax dollars, took on this project and designed a microchip that is powered by a lithium battery, rechargeable through the temperature changes in our skin. Without the knowledge of the Bible (Brother Sanders was not a Christian at the time), these engineers spent one-and-a-half-million dollars doing research on the best and most convenient place to have the microchip inserted.
Guess what? These researchers found that the forehead and the back of the hand (the two places the Bible says the mark will go) are not just the most convenient places, but are also the only viable places for rapid, consistent temperature changes in the skin to recharge the lithium battery. The microchip is approximately seven millimeters in length, .75 millimeters in diameter, about the size of a grain of rice. It is capable of storing pages upon pages of information about you. All your general history, work history, criminal record, health history, and financial data can be stored on this chip.
Brother Sanders believes that this microchip, which he regretfully helped design, is the “mark” spoken about in Revelation 13:16–18. The original Greek word for “mark” is “charagma,” which means a “scratch or etching.” It is also interesting to note that the number 666 is actually a word in the original Greek. The word is “chi xi stigma,” with the last part, “stigma,” also meaning “to stick or prick.” Carl believes this is referring to a hypodermic needle when they poke into the skin to inject the microchip.”
Mr. Sanders asked a doctor what would happen if the lithium contained within the RFID microchip leaked into the body. The doctor replied by saying a terrible sore would appear in that location. This is what the book of Revelation says:
“And the first (angel) went, and poured out his vial on the earth; and there fell a noisome and grievous sore on the men which had the mark of the beast, and on them which worshipped his image” (Revelation 16:2).
You can read more about it here–and to also understand the mystery behind the number 666: https://2RUTH.ORG
The third angel’s warning in Revelation 14:9-11 states,
“Then a third angel followed them, saying with a loud voice, ‘If anyone worships the beast and his image, and receives his mark on his forehead or on his hand, he himself shall also drink of the wine of the wrath of God, which is poured out full strength into the cup of His indignation. He shall be tormented with fire and brimstone in the presence of the holy angels and in the presence of the Lamb. And the smoke of their torment ascends forever and ever; and they have no rest day or night, who worship the beast and his image, and whoever receives the mark of his name.'”
Great hope is in our midst, and is coming in a mighty way–the greatest revival for Jesus in the history of the world where we will see the most souls come to Him of all tribes, tongues, nations, and peoples (Rev. 7:9-10); for we have this promise in God’s Word in the midst of these dark times:
“Then I saw an angel coming down from heaven, having the key to the bottomless pit and a great chain in his hand. He laid hold of the dragon, that serpent of old, who is the Devil and Satan, and bound him for a thousand years (not literal–rather a spiritual label for time spent in eternity); and he cast him into the bottomless pit, and shut him up, and set a seal on him, so that he should deceive the nations no more till the thousand years were finished. But after these things he must be released for a little while (when the Antichrist and false prophet will rise up and God will test the world).” (Revelation 20:1-3)
“The coming of the lawless one (the Antichrist) is according to the working of Satan, with all power, signs, and lying wonders, and with all unrighteous deception among those who perish, because they did not receive the love of the truth, that they might be saved. And for this reason God will send them strong delusion, that they should believe the lie, that they all may be condemned who did not believe the truth but had pleasure in unrighteousness.” (2 Thessalonians 2:9-12)”
Who is Barack Obama, and why is he still involved in politics?
So what about his name? The meaning of someone’s name can say a lot about a person. God throughout history has given names to people that have a specific meaning tied to their lives. How about the name Barack Obama? Let us take a look at what may be hiding beneath the surface.
Jesus says in Luke 10:18, “…I saw Satan fall like lightning from heaven.”
The Hebrew Strongs word (H1299) for “lightning”: “bârâq” (baw-rawk)
In Isaiah chapter 14, verse 14, we read about Lucifer (Satan) saying in his heart:
“I will ascend above the heights of the clouds, I will be like the Most High.”
In the verses in Isaiah that refer directly to Lucifer, several times it mentions him falling from the heights or the heavens. The Hebrew word for the heights or heavens used here is Hebrew Strongs 1116: “bamah”–Pronounced (bam-maw’)
In Hebrew, the letter “Waw” or “Vav” is often transliterated as a “U” or “O,” and it is primarily used as a conjunction to join concepts together. So to join in Hebrew poetry the concept of lightning (Baraq) and a high place like heaven or the heights of heaven (Bam-Maw), the letter “U” or “O” would be used. So, Baraq “O” Bam-Maw or Baraq “U” Bam-Maw in Hebrew poetry similar to the style written in Isaiah, would translate literally to “Lightning from the heights.” The word “Satan” in Hebrew is a direct translation, therefore “Satan.”
When Jesus told His disciples in Luke 10:18 that He beheld Satan fall as lightning from heaven, if this were to be declared by a Jewish Rabbi today influenced by the poetry in the book of Isaiah, he would say these words in Hebrew–the words of Jesus in Luke 10:18 as, and I saw Satan as Baraq O Bam-Maw.
Malie and Natasha are the names of Obama’s daughters. If we write those names backward (the devil does things backwards) we would get “ailam ahsatan”. Now if we remove the letters that spell “Alah” (Allah being the false god of Islam), we get “I am Satan”. Coincidence? I don’t think so!
Obama’s campaign logo when he ran as President in the year 2008 was a sun over the horizon in the west, with the landscape as the flag of the United States. In the Isalmic religion, they have their own messiah that they are waiting for called the 12th Imam, or the Mahdi (the Antichrist of the Bible), and one prophecy concerning this man’s appearance is the sun rising in the west.
“Then I saw another angel flying in the midst of heaven, having the everlasting gospel to preach to those who dwell on the earth—to every nation, tribe, tongue, and people— saying with a loud voice, ‘Fear God and give glory to Him, for the hour of His judgment has come; and worship Him who made heaven and earth, the sea and springs of water.'” (Revelation 14:6-7)
Why have the words of Jesus in His Gospel accounts regarding His death, burial, and resurrection, been translated into over 3,000 languages, and nothing comes close (the Quran about 110 languages)? Because the same Spirit of God (YHVH) who created all people likewise transcends all people; therefore the power of His Word is not limited by people; while all other religions are man-made, therefore they tend to primarily stay within their own culture. The same God who speaks to all people through His creation of the heavens and earth that draws all people around the world likewise has sent His Word to the ends of the earth so that we may come to personally know Him to be saved in spirit and in truth through His Son Jesus Christ.
Jesus stands alone among the other religions that say to rightly weigh the scales of good and evil and to make sure you have done more good than bad in this life. Is this how we conduct ourselves justly in a court of law? Bearing the image of God, is this how we project this image into reality?
Our good works cannot save us. If we step before a judge, being guilty of a crime, the judge will not judge us by the good we have done, but rather by the crimes we have committed. If we as fallen humanity, created in God’s image, pose this type of justice, how much more a perfect, righteous, and Holy God?
God has brought down His moral laws through the 10 commandments given to Moses at Mt. Siani. These laws were not given so we may be justified, but rather that we may see the need for a savior. They are the mirror of God’s character of what He has written in our hearts, with our conscious bearing witness that we know that it is wrong to steal, lie, dishonor our parents, murder, and so forth.
We can try and follow the moral laws of the 10 commandments, but we will never catch up to them to be justified before a Holy God. That same word of the law given to Moses became flesh about 2,000 years ago in the body of Jesus Christ. He came to be our justification by fulfilling the law, living a sinless perfect life that only God could fulfill.
The gap between us and the law can never be reconciled by our own merit, but the arm of Jesus is stretched out by the grace and mercy of God. And if we are to grab on, through faith in Him, He will pull us up being the one to justify us. As in the court of law, if someone steps in and pays our fine, even though we are guilty, the judge can do what is legal and just and let us go free. That is what Jesus did almost 2,000 years ago on the cross. It was a legal transaction being fulfilled in the spiritual realm by the shedding of His blood with His last word’s on the cross crying out, “It is finished!” (John 19:30).
For God takes no pleasure in the death of the wicked (Ezekiel 18:23). This is why in Isaiah chapter 53, where it speaks of the coming Messiah and His soul being a sacrifice for our sins, why it says it pleased God to crush His only begotten Son.
This is because the wrath that we deserve was justified by being poured out upon His Son. If that wrath was poured out on us, we would all perish to hell forever. God created a way of escape by pouring it out on His Son whose soul could not be left in Hades but was raised and seated at the right hand of God in power.
So now when we put on the Lord Jesus Christ (Romans 13:14), where God no longer sees the person who deserves His wrath, but rather the glorious image of His perfect Son dwelling in us, justifying us as if we received the wrath we deserve, making a way of escape from the curse of death; now being conformed into the image of the heavenly man walking in a new nature, and no longer in the image of the fallen man Adam.
Now what we must do is repent and put our trust and faith in the savior, confessing and forsaking our sins, and to receive His Holy Spirit that we may be born again (for Jesus says we must be born again to see and enter the Kingdom of God in John chapter 3). This is not just head knowledge of believing in Jesus, but rather receiving His words, taking them to heart, so that we may truly be transformed into the image of God. Where we no longer live to practice sin, but rather turn from our sins and practice righteousness through faith in Him in obedience to His Word by reading the Bible.
Our works cannot save us, but they can condemn us; it is not that we earn our way into everlasting life, but that we obey our Lord Jesus Christ:
Jesus says,
“Not everyone who says to Me, ‘Lord, Lord,’ shall enter the kingdom of heaven, but he who does the will of My Father in heaven. Many will say to Me in that day, ‘Lord, Lord, have we not prophesied in Your name, cast out demons in Your name, and done many wonders in Your name?’ And then I will declare to them, ‘I never knew you; depart from Me, you who practice lawlessness!’ (Matthew 7:21-23)
“And having been perfected, He became the author of eternal salvation to all who obey Him.” (Hebrews 5:9)
“Now I saw a new heaven and a new earth, for the first heaven and the first earth had passed away. Also there was no more sea. Then I, John, saw the holy city, New Jerusalem, coming down out of heaven from God, prepared as a bride adorned for her husband. And I heard a loud voice from heaven saying, ‘Behold, the tabernacle of God is with men, and He will dwell with them, and they shall be His people. God Himself will be with them and be their God. And God will wipe away every tear from their eyes; there shall be no more death, nor sorrow, nor crying. There shall be no more pain, for the former things have passed away.’
Then He who sat on the throne said, ‘Behold, I make all things new.’ And He said to me, ‘Write, for these words are true and faithful.’
And He said to me, ‘It is done! I am the Alpha and the Omega, the Beginning and the End. I will give of the fountain of the water of life freely to him who thirsts. He who overcomes shall inherit all things, and I will be his God and he shall be My son. But the cowardly, unbelieving, abominable, murderers, sexually immoral, sorcerers, idolaters, and all liars shall have their part in the lake which burns with fire and brimstone, which is the second death.'” (Revelation 21:1-8)