 ARCORA FAUCETS
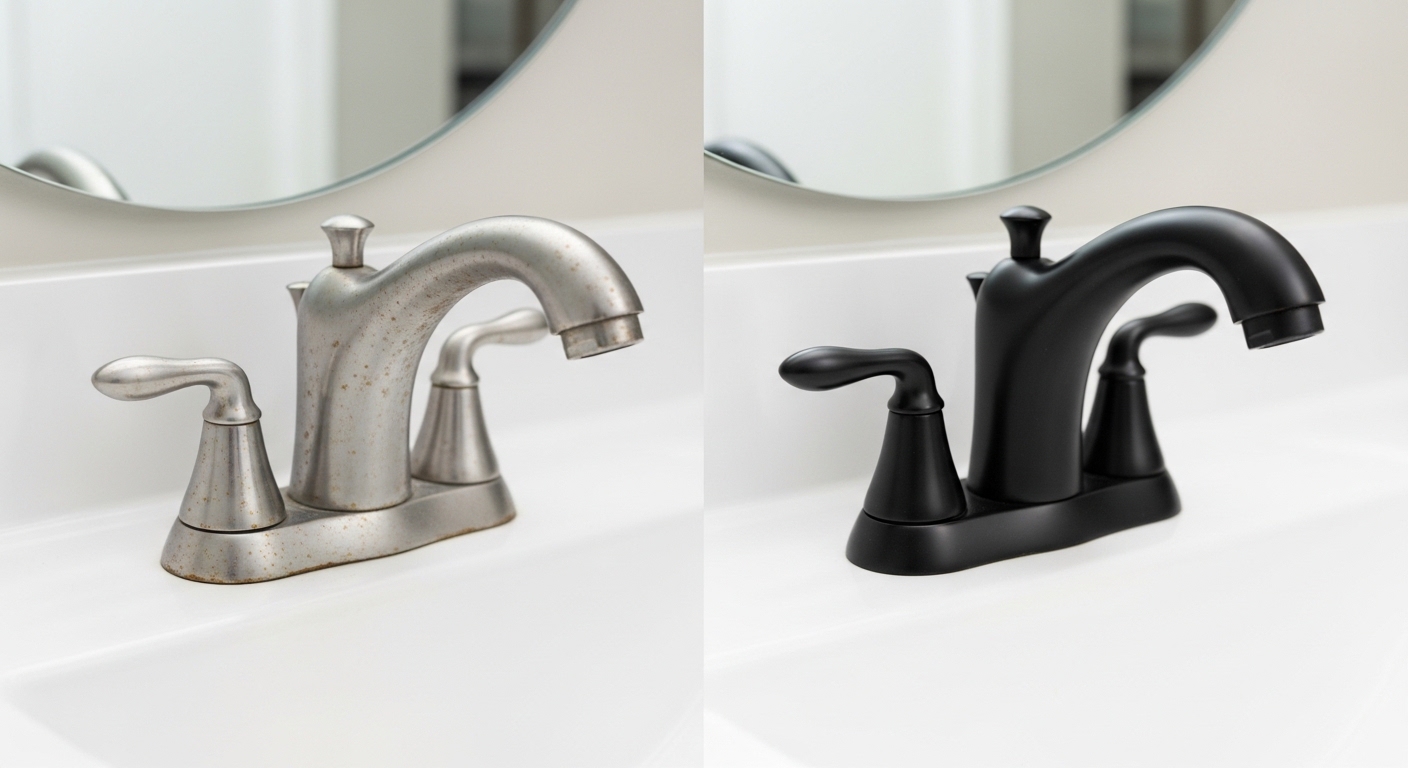
If you’ve been searching for rust oleum faucet paint because your once-shiny fixture now looks pitted, peeling, or hopelessly out of style, here’s the honest answer up front: painting a faucet works far better than most people expect, but the paint itself is the easy part. The prep and the topcoat decide whether your new finish looks like a $200 fixture or a scratched-off mess by next spring. Below I’ll walk you through exactly which Rust-Oleum products to use, how to prep so the finish actually bonds, how long it really lasts on a faucet you touch with wet hands every day, and when you should just replace the fixture instead.
I’ve refinished dozens of bathroom and kitchen fixtures — rentals, staging jobs, and my own aging brushed-nickel bath faucet — so this is written from what actually held up, not what the can promises.
Can you really paint a faucet with Rust-Oleum, or will it just peel off?
You can genuinely paint a faucet, and it will not peel off if you prep it correctly — the peeling everyone complains about comes from skipping degreasing and scuff-sanding, not from the paint being bad. A faucet is chrome-slick, non-porous, and coated in invisible hand oils, so paint has nothing to grip unless you give it a mechanical and chemical bite first.
The physics is simple. Spray enamel bonds to a surface in three ways: mechanical (micro-scratches the paint locks into), chemical (a compatible primer), and cleanliness (zero oil or soap film). Skip any one of those on a glossy faucet and the paint sits on top like a sticker — it looks fine for a week, then chips at the handle where your thumb rubs. Nail all three and Rust-Oleum enamel behaves like a real, if thinner, coating.
The trade-off you’re accepting: even a perfect job is a refinish, not a re-plating. Factory faucet finishes are electroplated or PVD-coated at high temperature and are rated to survive years of abrasion. A room-temperature spray finish is durable for what it is, but it’s a cosmetic layer. Go in expecting “looks great, treat it gently,” not “indestructible.”
Which Rust-Oleum paint should you actually buy for a faucet?
For most faucets, buy Rust-Oleum Universal or Specialty Metallic spray for the color coat plus a matching clear enamel topcoat — and if you want the toughest possible result, use their 2-part automotive-grade or appliance epoxy for a handle you touch constantly. The exact line matters because faucets live in a wet, high-contact zone that ordinary craft spray paint can’t handle.
| Rust-Oleum product | Best for | Durability on a faucet | Approx. price |
|---|---|---|---|
| Universal Metallic (spray) | Realistic metal look — brushed nickel, oil-rubbed bronze, gold | Good; needs clear topcoat | $10–$14 |
| Specialty Metallic / Matte finishes | Matte black, modern flat looks | Good on handles/spout, scuffs at wear points | $8–$12 |
| Appliance Epoxy (spray) | Hardest single-can option; white/almond/black | Very good — moisture and scrub resistant | $9–$13 |
| Clear Enamel / 2X Clear topcoat | Sealing and protecting any color coat | Essential — adds 1–2 years of life | $8–$12 |
| Self-Etching Primer | Bare metal / heavily sanded chrome | Dramatically improves adhesion | $8–$11 |
The single biggest upgrade over a basic rattle-can job is the clear topcoat. It’s the layer your hands, water, and cleaning spray actually contact — it takes the abuse so the color coat underneath survives. Never leave a painted faucet without one.
One quick note on color: if you’re chasing a warm metal like brass or champagne bronze, a painted finish will never quite read as the real thing under close inspection. If authenticity is the whole point, it’s worth understanding the difference between real and simulated metal finishes before you commit — our guide on whether a brass faucet is real brass and how to tell before you buy explains why a genuine metal fixture behaves so differently from a coated one.
How do you prep and paint a faucet so the finish actually lasts?
The reliable sequence is: remove or fully mask the faucet, degrease it, scuff-sand it, prime it, apply thin color coats, then clear-coat it — with cure time between each stage. Rushing any step is the number-one reason painted faucets fail. Here’s the process I use.
- Remove the faucet if you can. Painting a faucet off the sink gives a 10× better result — you can hit every angle, avoid overspray on the counter, and let it cure undisturbed. If you’re already comfortable pulling fixtures, our walkthrough on how to remove an old Moen bathroom faucet covers the shutoff-valve and supply-line steps that apply to most brands.
- Degrease obsessively. Wash with dish soap, rinse, then wipe with isopropyl alcohol or mineral spirits. This removes the hand oils and soap scum that kill adhesion. Don’t touch the bare surface with your fingers after this.
- Scuff-sand. Go over the entire faucet with 400–600 grit sandpaper or a fine sanding sponge until the shine is dulled to a uniform haze. You’re not removing the chrome — you’re giving the primer teeth. Wipe off dust with a tack cloth.
- Mask what you can’t remove. Cover aerator threads, the spout opening, and any rubber gaskets. Overspray inside the waterway is something you want to avoid.
- Prime. Use self-etching primer on scuffed chrome. Two light coats, 10 minutes apart. Let it flash off.
- Color coat — thin and patient. Hold the can 10–12 inches away and apply 3–4 light coats, not one heavy one. Heavy coats run and stay soft for weeks. Wait the full recoat window on the label (usually within 1 hour, or after 48 hours — never in between).
- Clear coat. Two to three coats of clear enamel over the color. This is non-negotiable for a faucet.
- Cure — really cure. The paint is dry to the touch in an hour but not cured for 5–7 days. Full hardness can take up to two weeks. Reinstall gently and avoid heavy use during that window.
If you’re painting the faucet in place rather than removing it, mask the sink, counter, and wall generously and ventilate the room hard — spray enamel fumes are strong and the overspray drifts farther than you’d think.
What grit sandpaper and how many coats do you need?
Use 400–600 grit for scuffing and plan on 3–4 thin color coats plus 2–3 clear coats. Coarser grit than 400 leaves scratches that telegraph through the paint; finer than 600 barely bites. And more thin coats always beat fewer thick ones — thin coats cure harder, resist runs, and level better on the curved surfaces of a spout and handle.
How long does a painted faucet finish actually last?
Realistically, expect 1–3 years on a bathroom faucet and closer to 1–2 years on a kitchen faucet, with the wear showing first at the handle and any pull-down spray head. Painted finishes fail at contact points, not flat surfaces — so the spout body might look perfect at year three while the lever handle is worn through at the thumb.
What extends that lifespan:
- The clear topcoat — the single biggest durability factor.
- Gentle cleaning — soft cloth and mild soap only. No abrasive pads, no bleach, no acidic descalers.
- Low-contact placement — a guest bath faucet lasts far longer than a busy family kitchen faucet.
- Full curing before use — putting a soft finish back into service is how people ruin an otherwise perfect job in week one.
If your fixture is already leaking, wobbling, or mechanically failing, paint won’t save it — you’d be putting lipstick on a fixture that needs internal repair or replacement. A faucet that’s noisy, dripping, or physically bent has a functional problem, and a cosmetic coat only hides it. When a spout is visibly damaged, our piece on whether a bent or crooked tub spout should be fixed or replaced is a good gut-check on repair-versus-replace logic that applies to sink faucets too.
Rust-Oleum faucet paint vs. a faucet cover vs. replacing the faucet — which should you choose?
Choose paint when the faucet works fine and you want a cheap style refresh; choose a slip-on cover when you want zero mess and full reversibility; and replace the faucet when it leaks, sticks, or you want a finish that lasts a decade. Each solves a different problem.
| Option | Cost | Effort | Durability | Best when… |
|---|---|---|---|---|
| Rust-Oleum faucet paint | $15–$35 total | Half a day + cure time | 1–3 years | Faucet works; you want a custom color cheaply |
| Slip-on faucet cover | $10–$25 | Minutes, no mess | Varies; fully reversible | Renters; no-commitment refresh |
| New faucet | $60–$300+ | 1–2 hours install | 10+ years | Leaks, wear, or you want factory finish |
If you like the idea of changing your fixture’s look without any solvent, sanding, or cure time, a cover is worth a serious look — we break down how well they actually perform in the matte black faucet cover guide, which is the lowest-risk way to test a new finish before you commit to painting or replacing anything.
Is it cheaper to paint a faucet or buy a new one?
Painting is cheaper up front — usually $15–$35 in materials versus $60–$300 for a new fixture — but a new faucet is cheaper per year of service because it lasts 10+ years instead of 1–3. If you’ll repaint every couple of years, or if the faucet already has functional issues, the “cheap” paint job quietly becomes the more expensive path.
Will painting a faucet cause it to rust or affect the water?
No — painting the exterior of a faucet won’t make it rust and won’t contaminate your water, as long as you keep paint off the waterway and out of the aerator. Most faucet bodies are brass or zinc alloy that don’t rust the way steel does; “Rust-Oleum” is a brand name, not a promise that your faucet was rusting. The paint is purely cosmetic and sits on the outside surfaces only.
The one real caution: don’t spray into the spout opening or onto the aerator screen, and don’t paint the internal cartridge or O-rings. Paint in the waterway can flake into your water or clog the aerator, hurting flow. Mask those areas, and if flow ever weakens afterward, unscrew and clean the aerator first — it’s almost always the culprit and it’s a two-minute fix.
A note on expertise, testing, and standards
Author note: This guide was written by the arcorafaucet product team, drawing on hands-on refinishing of chrome, brushed-nickel, and oil-rubbed-bronze fixtures across real bathrooms and kitchens. We test finishes the way you’d actually use them — wet hands, daily cleaning, and abrasion at the handle — not in a lab vacuum.
As a manufacturer and retailer of faucets and bathroom fixtures, arcorafaucet designs products to meet recognized plumbing standards (such as cUPC/NSF-type certifications for wetted components) and backs its fixtures with warranty coverage — because a finish, painted or factory, is only as good as the valve and cartridge underneath it. When you’re weighing a $20 paint job against a warrantied fixture, remember that the warranty covers the mechanics that a coat of spray paint never can. Always follow the Rust-Oleum can’s safety, ventilation, and cure-time instructions, and check your faucet manufacturer’s guidance before altering its finish if it’s still under warranty.
FAQ
Does Rust-Oleum make a specific faucet or fixture paint?
Rust-Oleum doesn’t sell a can literally labeled “faucet paint,” but their Universal Metallic, Specialty Metallic, and Appliance Epoxy lines are the products people use on faucets. Pair any of them with a self-etching primer and a clear enamel topcoat for a fixture-appropriate result.
Can you use Rust-Oleum on a kitchen faucet that gets used all day?
You can, but it’s the hardest test for a painted finish — high-contact handles and pull-down sprayers wear fastest. Use Appliance Epoxy plus 2–3 clear coats, cure it a full week before heavy use, and accept that you’ll likely touch it up within a year or two on a busy kitchen faucet.
How long before I can use the faucet after painting it?
It’s dry to the touch in about an hour, but wait at least 5–7 days of curing before regular use and up to two weeks for full hardness. Using it too early leaves fingerprints and wear marks in soft paint — the most common way a good job gets ruined.
Do I have to remove the faucet to paint it?
No, but removing it gives a dramatically better and longer-lasting finish because you can reach every angle and let it cure undisturbed. If you paint it in place, mask the sink and counter thoroughly and ventilate the room well.
Why is my painted faucet already chipping?
Almost always inadequate prep — skipped degreasing, no scuff-sanding, no primer, or no clear topcoat. Paint needs a clean, dulled, primed surface to bond to; on slick, oily chrome it peels. Strip it, prep properly this time, and finish with clear coat.