 ARCORA FAUCETS
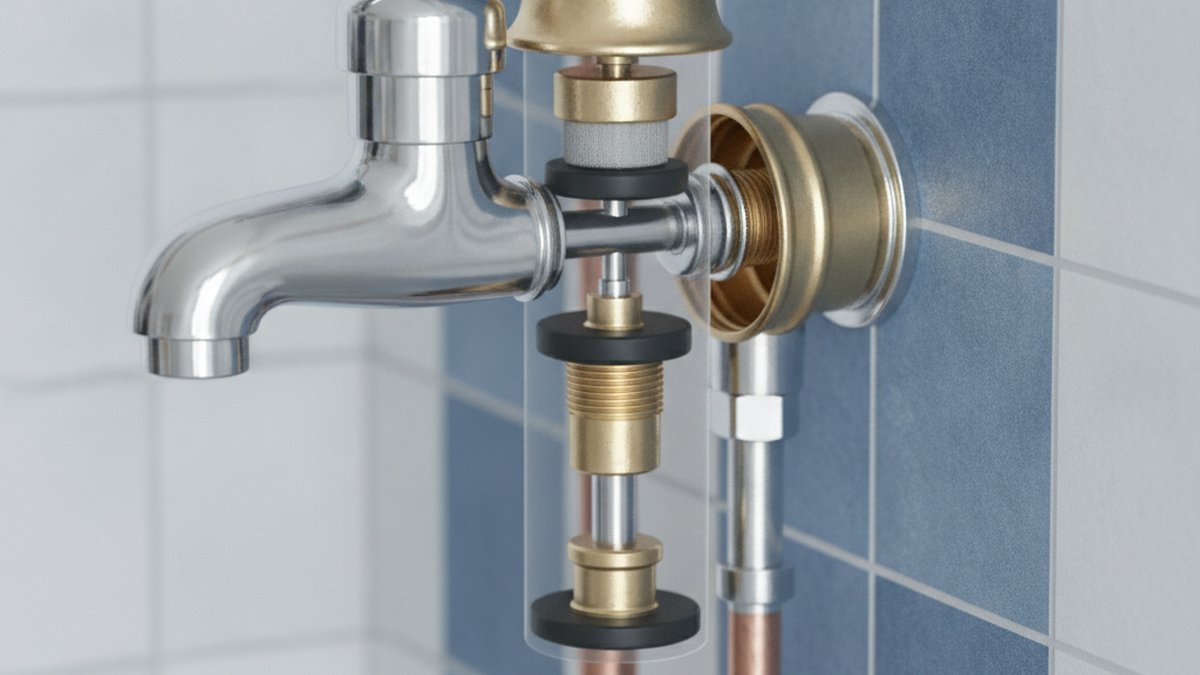
If your bathtub handle drips no matter how hard you crank it, or it squeals and grinds when you turn it, a tub faucet valve stem replacement is almost always the fix — and it’s one of the most beginner-friendly plumbing repairs you can do. The valve stem is the part inside your tub handle that opens and closes to let water through. When its rubber washer or seat wears out, water sneaks past and drips forever. Below, we’ll walk through exactly how people ask about this repair, when to replace the stem versus the whole valve, what parts to buy, and how to get it right the first time.
What exactly is a tub faucet valve stem, and how do I know it’s the problem?
The valve stem is the threaded brass shaft behind your tub handle that screws in and out to press a rubber washer against a seat, stopping the water. If your tub drips at the spout, the handle is stiff or wobbly, or water weeps out around the base of the handle, a worn stem or washer is the most likely culprit. You’re dealing with a stem-style (compression) valve if turning the handle takes several rotations before the water stops — that “screwing” motion is the giveaway.
Here’s the quick diagnosis. A steady drip from the spout after you’ve firmly turned the handle off = worn seat washer at the tip of the stem. Water leaking around the handle itself when the water is running = worn O-ring or packing on the stem body. Grinding, squealing, or a handle that suddenly turns too easily = stripped stem threads. All three point to the same repair: pull the stem and either rebuild it or swap it. If your handle only turns a quarter-turn to go from off to full blast, you likely have a cartridge or ceramic-disc valve instead, which is a different (though similar) fix.
Stem valve vs. cartridge valve — which one do I actually have?
You have a stem (compression) valve if there are two separate handles (hot and cold) and each turns multiple full rotations; you have a cartridge if a single handle controls temperature and flow, or if the handle moves in a short arc. This matters because it decides what part you buy. Compression stems use a replaceable washer at the tip; cartridges are usually replaced as a whole unit. If you discover you actually have a cartridge, the process is nearly identical to a stem swap — the same approach we cover in our guide to a Rohl faucet cartridge replacement, just with a different part in your hand.
| Feature | Compression stem valve | Cartridge valve |
|---|---|---|
| Handle motion | Several full turns to shut off | Short arc / quarter-turn |
| Common leak cause | Worn seat washer or O-ring | Cracked or scored cartridge |
| Typical repair cost | $8–$25 (washer + O-ring kit) | $15–$60 (whole cartridge) |
| Tools needed | Stem/shower socket wrench, screwdriver | Cartridge puller, pliers |
| Repair time | 30–45 min | 30–60 min |
| Best for | Older two-handle tubs | Modern single-handle valves |
What tools and parts do I need for a tub faucet valve stem replacement?
You need a deep socket wrench (often called a tub-and-shower stem socket set), a flathead and Phillips screwdriver, an adjustable wrench, plumber’s grease, and the correct replacement stem or a washer-and-O-ring rebuild kit. Buy the matching part by bringing the old stem to the store or matching your faucet brand and model — stems are not universal.
Here’s the realistic shopping list so you only make one trip:
- Tub/shower socket wrench set — the recessed stem sits deep in the wall, so a regular socket won’t reach it.
- Replacement valve stem OR a rebuild kit — a kit with assorted seat washers, brass screws, and O-rings runs $6–$12; a full brand-matched stem runs $15–$40.
- Seat wrench — if the brass seat the washer presses against is pitted, you’ll want to unscrew and replace it too.
- Plumber’s grease (silicone) — never petroleum-based, which degrades rubber O-rings.
- Plumber’s tape (PTFE) for re-sealing threaded connections.
- A rag and a small container to catch drips and hold tiny screws.
One pro tip: stuff a rag in the tub drain before you start. The single most common way this job goes sideways is dropping a handle screw straight down the drain. If you’re also fighting corrosion on the visible metal, our guide on how to fix a rusted faucet covers cleaning and protecting the finish once the mechanical repair is done.
How do I replace a tub faucet valve stem step by step?
Shut off the water, remove the handle and escutcheon, unthread the bonnet nut and stem with a socket wrench, replace the washer/O-ring or the whole stem, then reassemble and test. The full sequence takes 30–60 minutes for a first-timer. Follow these steps in order:
- Turn off the water. Use the tub’s shutoff valves if it has them, or shut off the main supply to the house. Then open the tub faucet to drain residual pressure.
- Remove the handle. Pop off the decorative cap, remove the center screw, and pull the handle straight off. If it’s stuck from mineral buildup, a handle puller or gentle rocking helps.
- Remove the escutcheon (the wall plate). It either unscrews or is held by a set screw. Set it aside.
- Unthread the bonnet/packing nut. With your adjustable wrench, loosen the nut holding the stem in place.
- Extract the stem. Slide the deep socket over the stem and turn counterclockwise. Older stems may be seized — a shot of penetrating oil and patience beats brute force that snaps the brass.
- Inspect and replace. Check the seat washer at the tip, the O-rings on the body, and the brass seat inside the wall. Replace the worn parts, or install a brand-new matching stem. Coat the O-rings and threads lightly with silicone grease.
- Reassemble in reverse. Thread the stem back in, snug the bonnet nut, replace the escutcheon and handle.
- Turn water back on slowly and test. Watch for drips at the spout and around the handle for a few minutes.
If, once you’re in there, the stem looks fine but the spout itself is corroded or the diverter is failing, the issue may be downstream. That’s when it’s worth reading our breakdown of a bathroom faucet head replacement to decide whether to swap just the spout instead of chasing the leak at the valve.
What if the valve seat behind the stem is also worn?
If a new washer still drips, the brass seat the washer presses against is pitted or grooved — replace or re-grind it. Use a seat wrench to unscrew the old seat and drop in an exact match, or use a seat-dressing tool to smooth minor scoring. A perfect washer on a chewed-up seat will leak again within weeks, so don’t skip this check. This is the number-one reason a “completed” repair fails and people wrongly conclude the whole valve is dead.
When should I just replace the whole valve instead of the stem?
Replace the entire valve body when the stem threads inside the valve are stripped, the valve body is cracked or badly corroded, or replacement stems for your model are discontinued. That’s a bigger job that usually means opening the wall and sweating or press-fitting new connections — the point at which most people call a plumber. For a new build or a full remodel, many pros install a universal rough-in valve so future repairs are simple; our explainer on the MultiChoice universal shower valve body rough-in kit shows why that upgrade pays off.
A quick decision guide:
- Just the stem/washer: Drip or hard-to-turn handle, valve body sound. 90% of cases.
- Stem + seat: Persistent drip after a new washer. Add 10 minutes.
- Whole valve: Cracked body, stripped internal threads, or no parts available. Consider a pro.
Cost-wise, a stem repair is $8–$40 in parts. A full valve replacement with a plumber typically runs $150–$400 depending on wall access and whether tile has to come out. Given that gap, it’s always worth attempting the stem repair first.
How much does a tub faucet valve stem replacement cost, and is it worth doing myself?
Doing it yourself costs $8–$40 in parts and about an hour of your time; hiring a plumber for the same job runs $100–$250 including a service call. For a straightforward stem-and-washer swap, DIY saves the most money of any bathroom repair relative to effort. The skills carry over, too — once you’ve done a tub stem, related jobs like learning how to change bathroom faucet knobs feel trivial.
The math is simple: a dripping tub can waste 2,000–3,000 gallons of water a year, so even a $12 washer kit pays for itself fast. The only times DIY isn’t worth it are when the valve is buried behind tile with no access panel, when the stem is fused so badly that removal risks cracking the pipe, or when you simply don’t have the shutoff situation figured out. In those cases, the risk of turning a $12 fix into a flooded bathroom isn’t worth it.
How do I choose the right replacement stem so it actually fits?
Match the replacement stem by faucet brand, model, and thread count — or bring the old stem to the store and match it physically. Stems are not interchangeable across brands, and even one brand may use different stems for hot vs. cold. The safest method is to remove the old stem first, then shop with it in hand. If you can’t remove it yet, photograph the handle, note any brand markings, and count how many turns the handle makes from off to full.
When you’re shopping, pay attention to whether it’s a hot or cold stem (they’re often mirror-threaded), the broach pattern (the splined tip the handle grips), and the overall length. A stem that’s slightly too long or short won’t seat properly and will leak. Buying a quality brass stem over a cheap pot-metal one also matters — brass resists corrosion and lasts years longer, especially in hard-water areas.
Author note & why you can trust this guide
This guide was written by the Arcora product and technical team, who design, pressure-test, and service tub and shower valves for a living. Arcora (www.arcorafaucet.com) manufactures faucets and fixtures built to cUPC and NSF/ANSI standards and backs its tub and shower valves with a limited lifetime warranty on the valve mechanism against drips and defects. Every valve stem design we ship is cycle-tested for hundreds of thousands of open-close cycles before it reaches your bathroom, so the guidance here reflects how these parts actually wear and fail in real homes — not just theory. When we recommend replacing a seat washer or checking the brass seat, it’s because those are the exact failure points our own testing and warranty claims surface most often.
FAQ
Can I replace a tub faucet valve stem without turning off the main water?
Only if your tub has dedicated shutoff valves (often behind an access panel or accessible integral stops). If it doesn’t, you must shut off the main house supply — there’s no safe way around it, because the moment you unthread the bonnet nut, pressurized water will spray from the open valve. Always open the faucet afterward to release residual pressure before you start turning wrenches.
Why does my tub faucet still drip after I replaced the washer?
The most common reason is a worn or pitted valve seat behind the stem. A fresh washer pressing against a scored brass seat can’t form a tight seal, so it drips again. Use a seat wrench to replace the seat or a seat-dressing tool to smooth it. The other possibility is that you installed a washer that’s slightly the wrong size or the stem itself has stripped threads and no longer travels far enough to compress the washer.
How long does a tub valve stem replacement take for a beginner?
Budget 30 to 60 minutes for your first one. The actual mechanical work is quick; most of the time goes into shutting off water, freeing a stuck handle, and making a parts run if you didn’t pre-match the stem. Once you’ve done it once, a repeat repair takes 20 minutes or less.
Are tub faucet valve stems universal across brands?
No. Stems vary by brand, model, thread count, length, and broach (spline) pattern, and even hot and cold stems within the same faucet can differ. Never assume a stem is universal — match it by bringing the old one to the store or ordering the exact part for your faucet’s brand and model number.
Should I replace both the hot and cold stems at the same time?
It’s smart to. If one stem has worn out from years of use, the other is usually not far behind. Replacing both while the water is already off and your tools are out saves you from redoing the whole shutoff-and-disassembly process in a few months. At $8–$20 per stem, the extra parts cost is minor insurance against a second repair.