 ARCORA FAUCETS
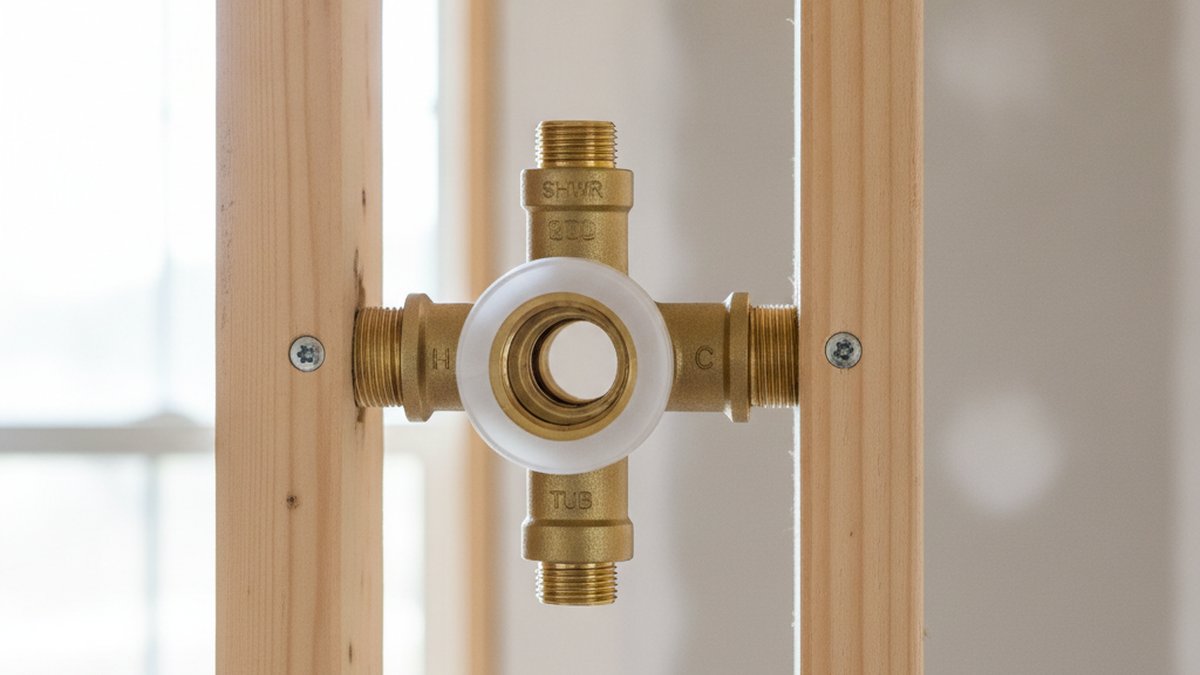
If you’re roughing in a new shower or gutting a bathroom, a multichoice universal shower valve body rough in kit is the single most important part you’ll bury in the wall — and the one people understand the least. It’s the pressure-balancing or thermostatic valve body (the guts), separate from the shiny handle and plate you see later (the trim). Getting the rough-in right matters because it’s behind tile: fix it once, live with it for 20 years. Below I’ll walk through what’s actually in the kit, how it’s different from the trim, how to install it correctly, and the mistakes that cost people a re-tile job.
What exactly is in a multichoice universal shower valve body rough in kit?
The kit is the valve body plus everything you need to plumb it into the wall — but usually not the finished handle. That “trim/valve separate” design is the whole point of the “universal” part: one standardized valve body accepts a huge range of trim styles and finishes down the road.
A typical rough-in kit includes:
- The brass valve body — with four ports: hot inlet, cold inlet, showerhead (top) outlet, and tub spout (bottom) outlet.
- Integral service stops — small screwdriver-turn shutoffs at the inlets so you can isolate the valve later without shutting off the whole house.
- A plaster guard (mud guard) — the plastic cap that protects the valve during tiling and sets your finished wall depth.
- Pressure-balancing cartridge — in most residential kits; this is the anti-scald mechanism.
- Mounting ears / plaster ground to screw the valve to a cross-brace between studs.
What’s usually sold separately: the trim kit (handle, escutcheon plate), the tub spout, the showerhead, and the shower arm. So a “rough-in kit” gets you watertight-in-the-wall; a “trim kit” makes it pretty. Confirm connection type — 1/2″ copper sweat, PEX crimp, CPVC, or 1/2″ IPS threaded — because the same valve body often ships in different inlet configurations.
Do I really need the universal rough-in valve, or can I just buy a whole shower faucet?
Yes, you need it — and the “buy the whole faucet” instinct is exactly what trips people up on a real remodel. The universal rough-in body is what makes future changes cheap. Because the valve body is standardized, you can install builder-grade trim today and upgrade to a matte-black or brushed-gold handle in five years by swapping only the trim — no tile demolition, no re-plumbing.
This is the same logic behind picking fixtures as a system rather than one-offs. If you’re coordinating finishes across the room, it’s worth thinking about the tub side too; our guide to the best bathroom tub faucet for your setup pairs naturally with a shower valve decision, and if you’re leaning dark, the matte black Roman tub filler guide covers matching the trim finish across the whole bathroom.
The one scenario where “just the valve body alone” isn’t enough: if you’re only replacing a leaking cartridge or an old handle and the existing valve body is already the same universal platform, you may only need a cartridge or trim — not a full rough-in kit.
What’s the difference between the rough-in valve and the trim kit?
The rough-in valve lives inside the wall and does the work; the trim lives outside the wall and does the looks. You buy them separately on purpose. Here’s the clean comparison:
| Aspect | Rough-In Valve Body | Trim Kit |
|---|---|---|
| Location | Inside the wall, behind tile | On the wall surface |
| Function | Mixes hot/cold, balances pressure, anti-scald | Handle, plate, decorative look |
| Installed when | During rough-in, before tile | After tile, at finish stage |
| Changed how often | Rarely (20+ years) | Any time — just unscrew and swap |
| Finish | Raw brass, hidden | Chrome, matte black, brushed nickel, gold, etc. |
| Typical cost | $40–$120 | $50–$300+ |
How do you install a multichoice universal shower valve body rough in kit?
Install the valve at the right height and depth, connect hot to the correct side, pressure-test before you close the wall, and leave the plaster guard on until tiling is done. That sequence is 90% of doing it right. Here’s the full process a competent DIYer can follow:
- Set the height. Mount the valve so the finished handle sits roughly 40–48 inches above the shower floor — around 48″ for a standing shower, lower (28–32″) for a tub-shower where you also reach it seated. Check the valve’s own depth markings.
- Nail a cross-brace between the studs and screw the valve’s mounting ears to it so it can’t move when you tile.
- Mind the depth. The plaster guard has min/max depth lines. Set the valve so your finished tile surface lands between them — this is the #1 rough-in error. Too deep and the trim won’t reach; too shallow and the plate won’t seat.
- Connect the ports correctly. Hot to the hot inlet (usually left), cold to cold (right), top outlet up to the shower arm, bottom outlet down to the tub spout. If it’s a shower-only install, cap the unused bottom outlet.
- Sweat or crimp your connections. If soldering copper directly to the valve, remove the cartridge first — heat destroys the rubber seals. Better yet, use the service-stop/union fittings.
- Pressure-test. Open the service stops, turn on the water, and run it with the plaster guard on. Check every joint for weeping. This is your last easy chance to catch a leak.
- Close the wall and tile. Leave the plaster guard installed the entire time — it keeps thinset, grout, and debris out of the valve.
- Add the trim last. Remove the guard, install the cartridge if it isn’t already in, set the anti-scald limit stop, and screw on the handle and escutcheon.
One detail people skip: the rotational limit stop (the anti-scald temperature limiter). After the trim’s on, set it so the hottest the handle allows is safe — especially with kids or elderly users in the house. It takes 60 seconds and it’s a genuine safety feature, not a suggestion.
Pressure-balancing vs. thermostatic: which valve body should you buy?
For most homes, a pressure-balancing valve is the right, affordable choice; go thermostatic only if you want to dial in an exact temperature or run multiple outlets at once. The difference is how they protect you from temperature swings:
| Feature | Pressure-Balancing | Thermostatic |
|---|---|---|
| How it works | Keeps hot/cold ratio steady when pressure drops (toilet flush) | Holds an exact water temperature you set |
| Anti-scald | Yes (prevents sudden hot spikes) | Yes, more precise |
| Set exact temp? | No | Yes, in degrees |
| Multiple outlets at once | Usually one function at a time | Handles body sprays + rain head simultaneously |
| Cost | Lower | Higher |
| Best for | Standard single-head showers | Spa showers, multiple sprays, luxury builds |
If you’re planning a multi-outlet spa setup — rain head plus body jets — a thermostatic body (and more outlets) is worth it, and our gold shower jet system guide walks through how those systems are plumbed and controlled. For a normal one-head shower, pressure-balancing is plenty.
Will the universal rough-in fit my existing shower — and can I reuse the old valve?
Sometimes yes: if your existing valve is already the same universal platform and in good shape, you can often just replace the cartridge or the trim and skip the rough-in kit entirely. The trap is assuming all “universal” valves cross-fit — they don’t. “Universal” means one brand’s trim fits that brand’s valve family across finishes and styles; it does not mean every brand’s trim fits every valve. Match the valve manufacturer to the trim manufacturer.
Quick way to check what you have:
- Pull the handle and escutcheon and look for a cast logo or model number on the valve or cartridge.
- Note whether it’s a single cartridge (single-handle) or two/three-handle setup — universal rough-ins are almost always single-handle.
- Measure inlet spacing and pipe type before ordering anything.
If your problem is a persistent drip rather than a full remodel, the culprit is usually the cartridge, not the whole valve body — the same way a rainfall shower head that randomly drips is often trapped water or a worn seal, not a failed valve. And if you’re only refreshing the look, changing the handle is closer to changing bathroom faucet knobs than to a rough-in job — no wall opening required.
How much does a shower valve rough-in cost, and is it a DIY job?
The valve body itself runs about $40–$120, and if the wall is already open and you’re comfortable with basic plumbing, it’s a legitimate DIY job for a half-day. The expensive part isn’t the valve — it’s the wall. Once tile is up, a mistake means demolition, so the “cost” of a rough-in is really the cost of getting it right the first time.
DIY it if: the wall is open (new build or gut remodel), you can solder or crimp confidently, and you’ll pressure-test before closing up. Call a pro if: the wall is closed and access is tight, you’re on galvanized or unusual piping, or your local code requires a licensed plumber and inspection for the rough-in (many jurisdictions do — check first). Whatever you choose, don’t skip the inspection where it’s required; a buried leak behind finished tile is the worst-case bathroom repair.
FAQ
Does a multichoice universal shower valve body rough in kit come with the handle?
Usually not. The rough-in kit is the in-wall valve body, service stops, cartridge, and plaster guard. The handle and escutcheon plate come in a separate trim kit so you can pick the finish and style — and change it later without touching the wall.
Can I install the valve now and add the trim later?
Yes, and that’s the intended workflow. Install and pressure-test the rough-in valve, tile the wall with the plaster guard on, then add the trim at the finish stage. That’s exactly why the platform is “universal” — the buried valve stays put while trim comes and goes.
What height should the shower valve be roughed in?
Around 48 inches above the shower floor for a standing shower, and roughly 28–32 inches for a tub-shower combo where you also reach the handle from a seated position. Always confirm against the depth and height markings on the valve’s plaster guard.
Do I need to remove the cartridge before soldering the valve?
Yes, if you’re sweating copper directly to the valve body. The heat from soldering will destroy the cartridge’s rubber O-rings and seals. Pull the cartridge first (or use the service-stop unions to keep heat away from the valve entirely), then reinstall it after everything cools.
How do I stop the shower from scalding after installing the trim?
Set the rotational limit stop when you install the trim. It’s an adjustable ring behind the handle that caps the maximum hot-water rotation. Turn on the water, adjust the stop so the hottest the handle reaches is a safe temperature, and lock it in — a 60-second step that’s genuinely important with kids or elderly users.
Is a universal valve body compatible with any brand’s trim?
No. “Universal” means one manufacturer’s trim fits that manufacturer’s valve family across finishes and styles — not that trim from a different brand will fit. Match the valve brand to the trim brand, and confirm the specific valve series the trim is rated for.
The bottom line
A multichoice universal shower valve body rough in kit is the part you install once and rarely think about again — which is exactly why doing it correctly matters. Get the height and depth right, connect hot and cold to the correct sides, pressure-test before you tile, and leave the plaster guard on until the very end. Do that, and you’ve bought yourself decades of easy trim upgrades and a shower that never surprises you with a scalding blast when someone flushes.
Author note: This guide was written by the Arcora Faucet product and installation team, drawing on hands-on experience specifying and installing shower valves across new-build and remodel projects. Arcora designs faucets and shower systems tested against standard residential water-pressure and durability benchmarks, and backs its fixtures with a manufacturer warranty. As always, follow your local plumbing code and the valve manufacturer’s installation instructions, and use a licensed plumber where your jurisdiction requires an inspected rough-in.