 ARCORA FAUCETS
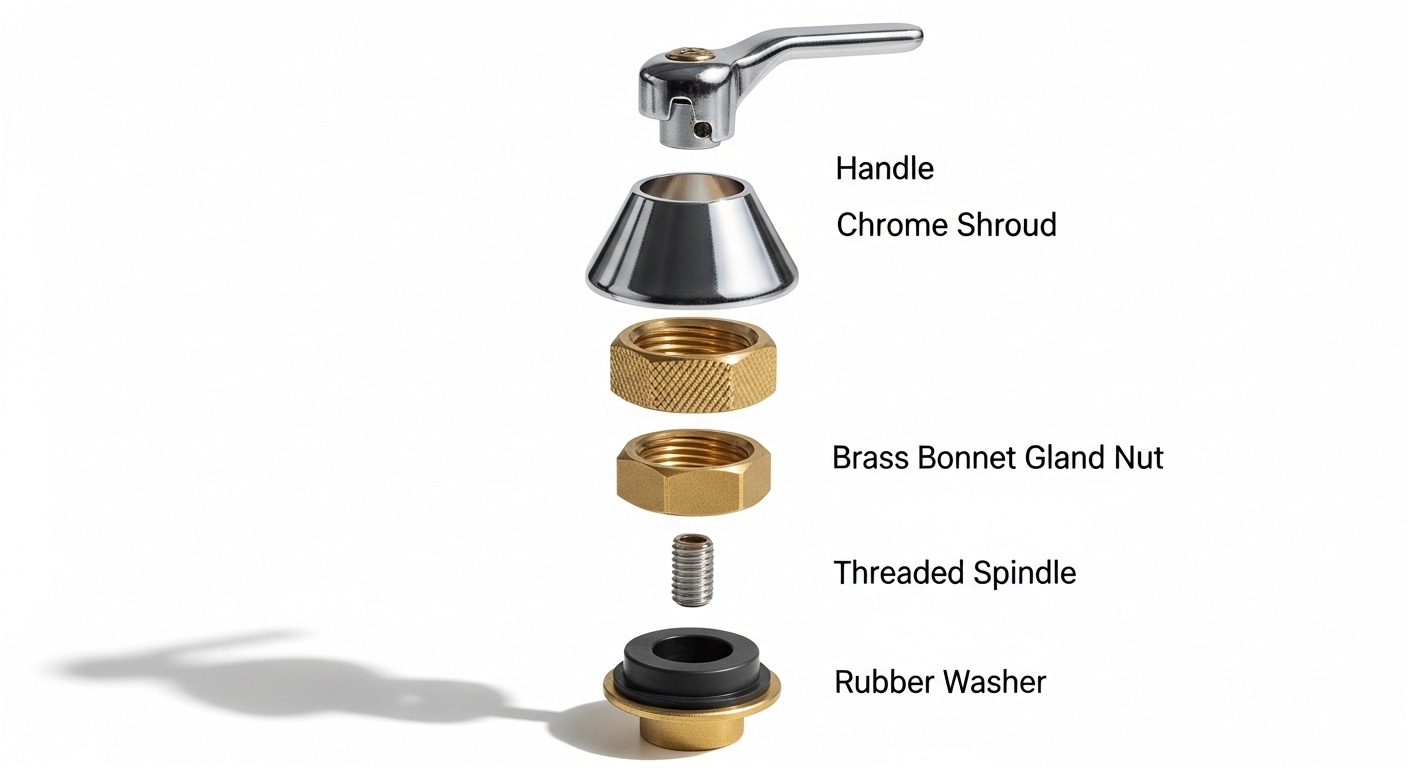
Learning how to remove old tap spindle hardware is the single most useful plumbing skill for anyone dealing with a dripping, stiff, or squeaky tap — because the spindle (the threaded valve stem that carries the washer) is almost always the part that’s worn out. The good news: on most compression taps you don’t need a plumber, you need about 20 minutes, a couple of basic tools, and the right order of operations. The bad news: if you rush it or crank on a seized spindle, you can crack the tap body or strip the threads — and that turns a $3 washer job into a full tap replacement.
This guide walks through the whole process for a standard compression (washer) tap, plus what to do when the spindle is corroded solid, how to tell a spindle apart from a modern ceramic cartridge, and how to reassemble everything so it doesn’t leak. Let’s get into it.
What exactly is a tap spindle, and how do I know that’s what I’m dealing with?
A tap spindle is the brass, threaded valve stem inside a traditional compression tap — you turn the handle, the spindle screws down, and a rubber washer on its end presses against the seat to stop the water. If your tap has a handle you turn multiple full rotations (a quarter-turn is a ceramic tap, not a spindle tap), and it drips from the spout when off, you almost certainly have a worn spindle or washer.
Here’s the quick field test. Turn the tap on and off. If it takes two or three full turns to go from off to full flow, and the handle gets progressively stiffer, that’s a compression spindle. If it snaps open and shut in a 90-degree twist, that’s a ceramic disc cartridge — a different part with a different removal method. This article is about the classic spindle type, which is still extremely common in bathrooms, laundries, garden taps, and older kitchens.
The reasons a spindle needs to come out are predictable: a perished washer (the tap drips), a worn spindle thread (the handle feels loose or gritty), a failed O-ring (water weeps up around the handle when it’s running), or you simply want to swap the whole spindle for a new “tap reviver” kit. Whatever the reason, the removal steps are the same.
What tools do I need to remove a tap spindle, and how long does it take?
You need surprisingly little: an adjustable spanner or the correct-size basin/tap spanner, a flat-head and Phillips screwdriver, penetrating oil (like WD-40 or a proper penetrant), a cloth, and ideally a pair of water pump pliers with a rag to protect the finish. Budget 15–25 minutes for a tap that cooperates, and up to an hour if the spindle is seized.
Here’s the full kit list so you’re not running to the hardware store mid-job:
- Adjustable spanner (250mm/10-inch is ideal) — for the bonnet/gland nut.
- Screwdrivers — flat and Phillips, for the handle grub screw or top button screw.
- Penetrating oil — non-negotiable for old or corroded taps.
- Cloth or rag — to protect chrome and plug the drain so you don’t lose small parts.
- Replacement parts — a new washer, O-ring, or a complete spindle/tap reviver kit that matches your tap.
- Old toothbrush and vinegar — to clean scale and grit off the seat before reassembly.
One tip that saves a lot of grief: put the plug in the sink or lay a rag over the drain hole. Grub screws and washers love to vanish down the plughole at the worst possible moment.
How do you remove an old tap spindle step by step?
Shut off the water, drain the tap, remove the handle and shroud, then unscrew the bonnet nut and lift out the spindle — in that order. Skipping the water shutoff or forcing a seized nut is what turns this into an expensive mistake, so work through it methodically.
- Turn off the water supply. Use the isolation valve under the sink if there is one (a small screwdriver turns the slot 90 degrees), or shut off the main stopcock. Don’t skip this — an open spindle bore under mains pressure will soak your bathroom in seconds.
- Open the tap to drain it and release pressure. Leave it open so any trapped water runs out and you’re not fighting residual pressure.
- Remove the handle. Look for a hidden grub screw on the side of the handle, or a decorative hot/cold button on top that pops off to reveal a retaining screw. Undo it and pull the handle straight up. If it’s stuck, wiggle gently or apply penetrating oil.
- Unscrew the chrome shroud (skirt/cover). This is usually hand-tight — twist it counter-clockwise. If it won’t budge, wrap a cloth around it and use pliers so you don’t scratch the chrome.
- Loosen the bonnet/gland nut. This is the hex brass nut now exposed at the base of the spindle. Fit your spanner squarely and turn counter-clockwise. Hold the tap body steady with your other hand so you’re not twisting the whole tap and cracking the joint under the sink.
- Unscrew the spindle out. Once the bonnet nut is loose, the spindle usually turns out by hand or lifts straight out with the bonnet as one assembly. There’s your worn washer on the bottom end.
- Inspect and replace. Swap the washer (held by a small nut or push-fit), replace the O-ring on the spindle body, and clean the seat inside the tap with vinegar and an old toothbrush.
That’s the clean version. Most of the time it really is that simple. The complication almost always comes at step 5 — a bonnet nut or spindle that hasn’t moved in 20 years and has effectively fused itself into the tap body with limescale and corrosion.
How do you remove a tap spindle that’s seized or corroded solid?
Soak the threads in penetrating oil for 10–15 minutes, then use steady back-and-forth “rocking” pressure — loosen a little, tighten a little — rather than one massive heave. Heat, leverage, and patience beat brute force every time, because raw force is exactly what cracks the tap body or shears the spindle.
Here’s the escalation ladder, from gentlest to most aggressive. Try them in order:
- Penetrating oil + time. Spray or drip it right onto the bonnet nut threads and the base of the spindle. Walk away for 15 minutes. Re-apply and try again. This alone frees most seized spindles.
- Rock it, don’t wrench it. Apply loosening pressure, then a touch of tightening pressure, alternating. This breaks the corrosion bond gradually without stressing the casting.
- More leverage — carefully. Slip a length of pipe over the spanner handle for extra torque, but keep your other hand firmly bracing the tap body so the force goes into the nut, not the plumbing joints below.
- Gentle heat. A hairdryer or heat gun on the brass bonnet expands the metal and cracks the scale bond. Never use an open flame near seals or a ceramic basin.
- Clean the exposed threads. As the spindle starts to back out, brush the threads with vinegar or a wire brush so it doesn’t bind again on the way up.
If the whole tap body starts twisting under the sink while you’re working, stop — you’re about to crack a fitting. Get a second spanner (or a helper) to hold the tap body or the pipe below completely still, then apply your force to the nut only. This same “hold the body, turn the fitting” principle is exactly what saves you when any small fitting is stuck; the technique we cover in our guide on doing faucet aerator removal when it’s stuck transfers directly to a seized spindle nut.
And a hard truth: sometimes the spindle thread inside the tap body is so corroded that even a freed spindle won’t reseat properly. If the tap is old, cheap, or badly limescaled, replacing the entire tap can be smarter than fighting a single spindle. Weigh the cost of a reviver kit against a new tap before you spend an afternoon on it.
Spindle vs. cartridge vs. tap reviver — which repair path should I take?
If your tap uses a spindle, you can usually fix a drip for a few dollars with a new washer; if the spindle threads or seat are shot, a tap reviver kit replaces the whole internal mechanism; and if it’s actually a ceramic cartridge tap, you replace the cartridge, not a washer. Match the repair to the part and you’ll avoid buying the wrong kit.
| Repair option | Best for | Rough cost | Difficulty | Lasts |
|---|---|---|---|---|
| New washer only | A tap that drips but otherwise turns smoothly | $2–$5 | Easy | 3–8 years |
| Washer + O-ring service | Dripping spout AND water weeping around the handle | $5–$12 | Easy | 5–10 years |
| Full spindle / tap reviver kit | Worn spindle thread, gritty handle, damaged seat | $15–$40 | Moderate | 10+ years |
| Ceramic cartridge swap | Quarter-turn taps (not a true spindle tap) | $15–$50 | Moderate | 10–15 years |
| Replace the whole tap | Cracked body, seized-solid spindle, or heavy corrosion | $40–$300+ | Moderate–Hard | 15+ years |
A tap reviver kit is the unsung hero here. If the drip comes back within weeks of a new washer, the seat inside the tap is worn and no washer will seal against it — a reviver replaces the seat and spindle in one go and is far cheaper than a new tap. It’s the same logic behind fixing a branded cartridge tap instead of ripping it out; if you’ve got a cartridge-style unit, our walkthrough on fixing a leaky Moen faucet at home shows how that repair differs from a spindle service.
How do I put the spindle back and make sure it doesn’t leak?
Clean the seat, fit a fresh washer and O-ring, lightly grease the threads with silicone plumber’s grease, then reassemble in reverse order — and only nip the bonnet nut up snug, not gorilla-tight. Over-tightening crushes the washer and O-ring, which causes the exact leak you were trying to fix.
- Wipe out the tap body and clean the brass seat with vinegar to remove limescale and grit.
- Fit the new washer to the base of the spindle and replace the O-ring on the spindle body.
- Smear a thin film of silicone-based plumber’s grease on the threads and O-ring so the handle turns smoothly and the seal lasts.
- Screw the spindle/bonnet assembly back in and tighten the bonnet nut firm but not brutal.
- Refit the shroud, then the handle and its screw. Make sure the handle is in the “off” position and the spindle is screwed down before you refit, so hot and cold line up.
- Turn the water back on slowly, then run the tap and check for drips at the spout and weeping around the handle.
If it weeps around the handle when running, the O-ring or gland packing needs attention — nip the gland nut a fraction tighter or replace the O-ring. If it drips from the spout, the washer isn’t seating; the seat may need re-cutting or a reviver kit. And while you’ve got everything apart, it’s a smart moment to descale the aerator and the visible metal — our guide to removing hard water stains without wrecking the finish pairs perfectly with a spindle service, since the same limescale that seized your spindle is dulling the chrome.
When should I stop DIY-ing and call a plumber?
Call a professional if you can’t isolate the water, if the tap body cracks or the thread strips, if the spindle simply will not move after heat and penetrant, or if the tap is plumbed into an unusual or high-pressure system you’re not confident about. There’s no shame in it — a $100 call-out beats a flooded bathroom and a burst joint.
Specifically, back off the DIY approach when: the isolation valve is seized or missing and you’d have to shut the whole house main for hours; the tap is a sealed designer unit with proprietary internals; or you notice the copper pipe below the tap flexing every time you apply spanner force (a sign the pipework itself is fragile). If you’re mid-job and something feels wrong, tighten everything back up, turn the water on to confirm no leak, and get a pro. Removing a spindle is genuinely easy — but knowing your limit is part of doing it well.
FAQ
Can I remove a tap spindle without turning off the water?
No — never attempt it. The spindle sits directly in the pressurized water path, and the moment you unscrew the bonnet nut with the supply on, water blasts out under full mains pressure. Always shut the isolation valve under the sink or the main stopcock first, then open the tap to drain any trapped water and relieve residual pressure before you touch the spindle.
Why is my tap spindle so hard to turn even after I loosened the nut?
A stiff spindle after the bonnet nut is loose usually means corrosion or limescale has built up on the spindle threads inside the tap body. Apply penetrating oil, use gentle back-and-forth rocking pressure instead of one hard twist, and clean the threads with vinegar or a wire brush as the spindle backs out. If it’s genuinely fused, warming the brass bonnet with a hairdryer expands the metal and breaks the bond.
Is a tap spindle the same as a cartridge?
No. A spindle is the threaded brass stem in a traditional compression (washer) tap that you turn several rotations to open and close. A cartridge — usually ceramic disc — is a sealed unit in a quarter-turn tap that opens fully in a 90-degree twist. They’re removed and replaced differently, so check whether your handle turns multiple rotations (spindle) or a quarter turn (cartridge) before buying parts.
What size spanner do I need for a tap bonnet nut?
Most domestic tap bonnet/gland nuts are covered by a 250mm (10-inch) adjustable spanner, which fits the common sizes without you needing an exact match. For tight spots, a dedicated basin or tap spanner with a slim head reaches nuts a standard spanner can’t. Always fit the spanner jaws squarely and fully onto the nut to avoid rounding off the corners.
My tap still drips after replacing the washer — what went wrong?
A persistent drip after a new washer almost always means the brass seat inside the tap body is worn or pitted, so the washer can’t form a tight seal against it. The fix is to re-cut the seat with a seat-grinding tool or, more simply, fit a complete tap reviver kit that replaces both the spindle and the seat. Over-tightening the handle to stop the drip only shreds the new washer faster.
Can I reuse the old spindle if it looks fine?
Yes, if the threads are clean and undamaged and the O-ring groove is intact, a good spindle just needs a fresh washer and O-ring. Inspect the threads for wear, stripping, or heavy corrosion — if the handle felt gritty or loose before, replace the whole spindle instead. Clean the reused spindle, apply silicone plumber’s grease, and it’ll serve for years.
Author note: This guide was written by the Arcora technical content team and reviewed against hands-on repair procedures for compression and ceramic taps. We build and test faucets and fixtures to recognized flow, pressure, and durability standards, and our products are backed by manufacturer warranty support — so the reassembly and sealing advice here reflects how these valves are actually engineered to perform. About Arcora: arcorafaucet designs kitchen and bathroom faucets, shower systems, and fixtures with a focus on serviceable, long-lasting hardware, and we publish these guides to help you maintain what you own rather than replace it prematurely.