 ARCORA FAUCETS
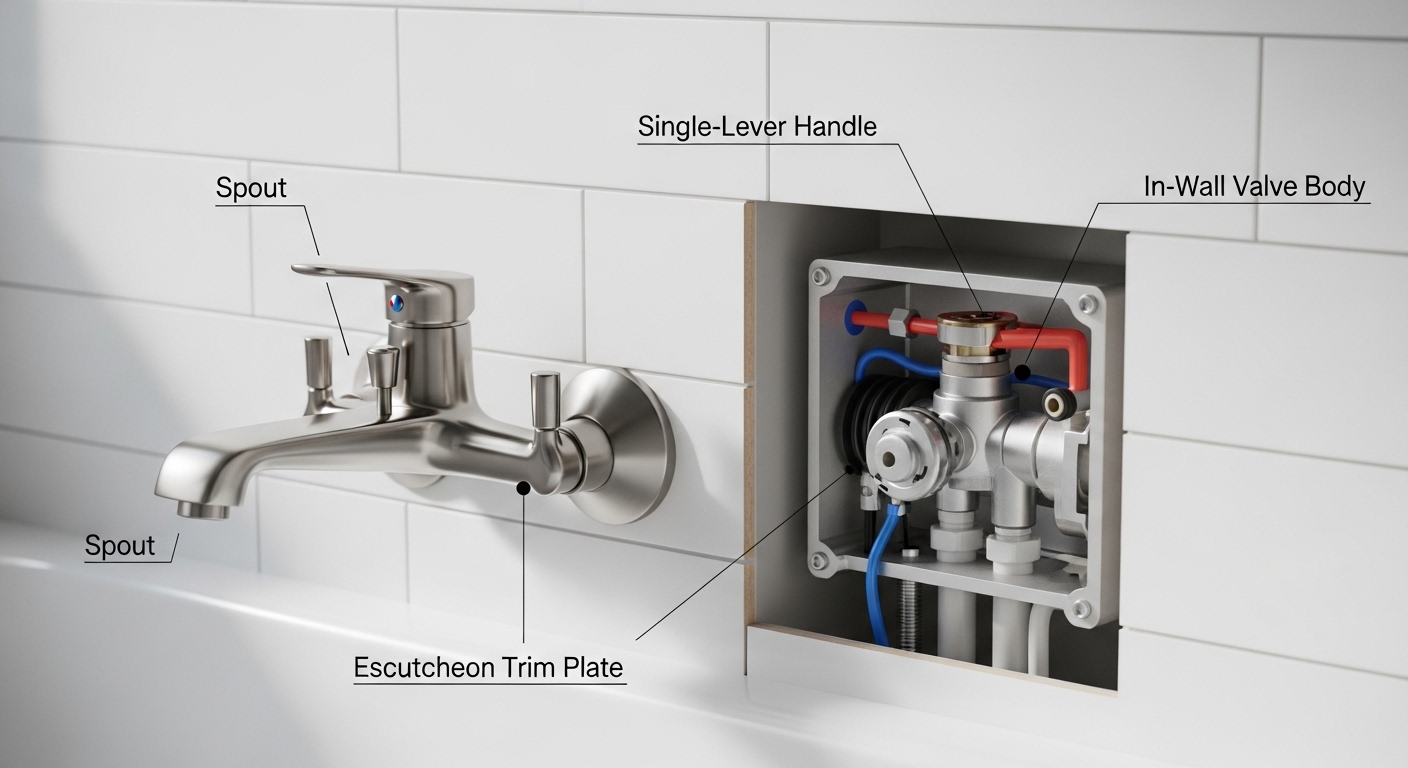
Learning how to change a bathroom faucet tub setup is one of the most satisfying DIY plumbing jobs you can do, because in the vast majority of cases you’re only swapping the visible parts — the spout, the handle, and sometimes the trim plate — not the valve buried inside the wall. If your tub faucet is dripping, dated, corroded, or you just hate the finish, you can usually fix or upgrade it in under an hour with tools you probably already own. This guide walks you through exactly how to do it, what to check before you buy a replacement, and when the job is genuinely beyond a screwdriver.
The key thing to understand up front: a “tub faucet” is really three separate pieces — the spout (where water pours out), the handle(s) (what you turn), and the valve/cartridge (the mechanism inside the wall). Ninety percent of the time you’re replacing the first two. Only the valve requires cutting into the wall.
Can You Replace a Tub Faucet Without Opening the Wall?
Yes — in most cases you can replace a tub faucet without opening the wall, as long as you’re only changing the spout and handle trim and keeping the same in-wall valve. The valve is the part that’s plumbed and soldered into your pipes; the spout and handle simply attach to it. If your valve is in good shape and not leaking behind the wall, you never need to touch the tile.
Here’s how to tell which job you’re facing. Turn the water on and off a few times. If the flow starts and stops cleanly and the only problem is a drip from the spout, a stiff handle, or an ugly finish, you’re doing a trim swap — the easy version covered in this guide. If water sprays behind the wall, the valve body itself is cracked, or you want to convert from two handles to one, you’re doing a valve replacement, which usually means opening the wall and often calling a pro. For a deeper look at what’s back there, our guide to the correct tub shower valve rough-in dimensions explains how the valve is positioned and plumbed.
What Tools and Parts Do You Need to Change a Tub Faucet?
You need very few tools to change a tub faucet: an adjustable wrench, a set of hex (Allen) keys, a Phillips screwdriver, plumber’s (PTFE) tape, and a tube of 100% silicone caulk. That’s genuinely it for a standard spout-and-handle swap. A rag and an old toothbrush for cleaning threads round out the kit.
- Adjustable wrench — for loosening threaded connections and supply nuts.
- Hex/Allen key set — most modern tub spouts and handles are held by a tiny set screw underneath.
- Phillips + flathead screwdriver — for handle screws and prying trim caps.
- Plumber’s tape (PTFE) — wrapped clockwise on threaded spout nipples to seal them.
- 100% silicone caulk — to seal the top edge of the spout and escutcheon against the wall.
- Old rag + toothbrush — to clean mineral buildup and old caulk off the threads and tile.
- The right replacement spout and handle — matched to your existing valve brand and connection type.
The single most important “part” decision is matching the spout connection. Before you buy anything, measure. Our detailed walkthrough on getting the right tub spout measurement shows you exactly how to measure length and thread type so your new spout actually fits the first time — this is the #1 reason DIYers make two trips to the hardware store.
How Do You Remove the Old Tub Spout and Handle?
To remove an old tub spout, first look underneath it: if you see a small set screw, loosen it with a hex key and the spout slides straight off (that’s a slip-on spout); if there’s no set screw, the spout threads off — turn it counterclockwise like a giant bolt. Handles come off after you pop the decorative cap and remove the screw underneath.
Do these steps in order:
- Shut off the water. Use the bathroom shut-offs if you have them, or the main house valve. Open the tub faucet afterward to relieve pressure and confirm the water is truly off.
- Cover the drain. Close the tub stopper or lay a rag over the drain so small screws don’t disappear down it.
- Remove the spout. Check underneath for a set screw. If present, back it out with a hex key and pull the spout off toward you. If not, grip the base and turn counterclockwise — a cloth-wrapped pipe wrench or a screwdriver through the spout opening for leverage helps if it’s stuck with mineral buildup.
- Remove the handle. Pry off the button/cap in the center, remove the exposed screw, and pull the handle off the valve stem. Then unscrew the escutcheon (trim plate) or its retaining nut.
- Inspect and clean. Wipe the wall pipe nipple and valve threads clean. This is your chance to spot corrosion or a worn cartridge before the new parts go on.
If your spout is stubborn, badly corroded, or you’re specifically dealing with a bent or damaged one, our guide on a bent or crooked tub spout covers the removal tricks and when it’s smarter to just replace the nipple too.
Slip-On vs. Threaded Tub Spouts: Which One Do You Have?
You have a slip-on spout if there’s a set screw on the underside and the spout slides onto a copper pipe stub; you have a threaded spout if it screws directly onto a threaded pipe (nipple) with no set screw. Getting this right determines which replacement you buy — they are not interchangeable without an adapter.
| Feature | Slip-On (Set-Screw) Spout | Threaded (Screw-On) Spout |
|---|---|---|
| How it attaches | Slides over a smooth copper pipe, locked by a tiny set screw underneath | Threads onto a galvanized or brass pipe nipple |
| Tell-tale sign | Small hex set screw on the bottom of the spout | No set screw; smooth underside |
| Sealing method | O-ring inside + silicone at the wall | PTFE tape or pipe dope on the threads |
| Removal | Loosen set screw, pull off | Turn counterclockwise to unscrew |
| Best for | Modern installs, easy swaps | Older homes, secure long-term fit |
Many replacement spouts today are “universal” and ship with both a set screw and a threaded adapter so they cover either scenario — but you still need to know your pipe type to seal it correctly. If the pipe stub is short or in an odd spot, re-check your measurement before buying.
How Do You Install the New Tub Faucet Spout and Handle?
To install a new tub spout, wrap the pipe threads with plumber’s tape (for threaded spouts) or slide the spout onto the copper stub and tighten the set screw (for slip-on), then run a bead of silicone along the top edge where the spout meets the wall. The handle goes on by reversing removal: escutcheon first, then handle onto the stem, then the screw and cap.
Step by step for the new install:
- Prep the connection. For a threaded spout, wrap the nipple 4–6 times clockwise with PTFE tape. For a slip-on, make sure the internal O-ring is seated and the copper stub is clean.
- Attach the spout. Thread it on hand-tight, then snug it a quarter-turn with a cloth-wrapped wrench until it points straight down — don’t overtighten and crack it. For slip-on, push it flush to the wall and tighten the set screw.
- Install the handle trim. Fit the new escutcheon, slide the handle onto the valve stem, secure the screw, and press on the cap. If your kit includes a new cartridge or O-rings, now’s the time to swap them.
- Seal it. Run a thin bead of 100% silicone along the top and sides of the spout base and escutcheon — leave the bottom edge unsealed so any water that gets behind can drain out and reveal a hidden leak.
- Test. Turn the water back on slowly, run hot and cold, and watch for drips at the spout base and behind the handle. Let the silicone cure per the tube’s instructions (usually 24 hours) before a full shower.
What If the New Faucet Still Leaks or Drips?
If your tub faucet still drips after a new spout and handle, the problem is almost always inside the valve — a worn cartridge, washer, or O-ring — not the parts you just installed. A drip from the spout tip when everything is off points to the valve; water seeping from the base of the spout points to a bad seal or O-ring you can redo.
Match the symptom to the fix:
- Drip from the spout when off → replace the valve cartridge or washer. This is the classic worn-out-cartridge leak.
- Leak at the spout base → re-seat the O-ring (slip-on) or re-tape the threads and reseal with silicone.
- Hot water leaking through when off → a specific cartridge failure that lets hot bleed past. Our guide on a tub spout leaking hot water when the water is off diagnoses this exact scenario.
- General ongoing drip you can’t pin down → our step-by-step on how to fix a leaking bathtub faucet quick and easy walks through cartridge replacement without a plumber.
The good news: cartridge replacement is itself a DIY job on most valve brands. You shut the water off, pull the retaining clip, slide out the old cartridge, and drop in a matching new one. The trick is buying the exact cartridge for your valve brand and model, so bring the old one to the store or photograph the trim before you shop.
When Should You Call a Plumber Instead of DIY?
Call a plumber when the job requires replacing the in-wall valve body, when you find water damage or rot behind the wall, or when your pipes are galvanized and corroded to the point that anything you touch might snap. Anything that involves soldering copper or cutting into tile is where most DIYers should stop.
Specific red flags that mean “get a pro”:
- The valve body itself is cracked or leaking behind the wall.
- You want to convert from a two-handle to a single-handle setup (new valve required).
- The pipe nipple snaps off inside the wall during removal.
- You see mold, soft drywall, or rotted framing when you open things up.
- Your home has old galvanized pipe that’s so corroded threads crumble.
None of these are failures on your part — they’re just jobs that need pipe work, and the cost of a plumber is far cheaper than water damage from a rushed repair. For the trim-swap version this guide covers, though, the risk is genuinely low.
A quick note on choosing a quality replacement
Whatever you install is only as good as the metal it’s made from. A cheap zinc spout will pit and corrode within a couple of years in hard water, while a solid brass body lasts decades. If you’re unsure what you’re buying, our explainer on whether a brass faucet is real brass shows you how to tell before you spend. Spending a little more on the fixture is the easiest way to make sure you only do this job once.
How Much Does It Cost to Change a Tub Faucet Yourself?
Changing a tub faucet yourself typically costs $25–$150 in parts — a replacement spout runs $15–$60, a handle/trim kit $20–$80, and consumables like tape and caulk under $15. That compares to $150–$350 if you hire a plumber for the same trim swap, so DIY saves you roughly $125–$300 on labor for about an hour of work.
| Item | DIY Cost | With a Plumber |
|---|---|---|
| Replacement spout | $15–$60 | $15–$60 (parts) |
| Handle / trim kit | $20–$80 | $20–$80 (parts) |
| Tape, caulk, misc. | $10–$15 | included |
| Labor | Free (your time) | $150–$300 |
| Total | $45–$155 | $185–$440 |
If you’re also refreshing the look rather than fixing a leak, you don’t always have to replace at all — for certain finishes a cover or restyle can buy you time, as we cover in our matte black faucet cover guide. But for a leaking or corroded faucet, a full swap is the right call.
FAQ
Do I need to turn off the water to change just the tub spout?
Yes. Even though the spout itself doesn’t hold pressure the way the valve does, water can still flow or drip through while you work, and you don’t want to knock the valve open mid-removal. Shut off the bathroom or main supply, then open the faucet to relieve any remaining pressure before you start.
How do I know if my tub spout is slip-on or threaded?
Look at the underside of the spout near the wall. If you see a small hex set screw, it’s a slip-on spout that slides onto a copper pipe. If there’s no set screw and the spout meets a threaded metal pipe, it screws on. When in doubt, remove it and inspect the pipe stub — smooth copper means slip-on, threaded pipe means screw-on.
Can I put a single-handle faucet where two handles used to be?
Not as a simple trim swap. Two-handle and single-handle setups use completely different valve bodies plumbed into the wall, so converting requires opening the wall and replacing the valve — a job best left to a plumber unless you’re comfortable with pipe work. If you’re keeping the same configuration, though, it’s an easy DIY change.
Why does my new tub faucet drip even after I replaced the spout?
A drip after replacing the spout almost always means the valve cartridge or washer inside the wall is worn, not the new spout. The spout is just the outlet; the valve controls the seal. Replace the cartridge that matches your valve brand, and the drip usually stops. If water leaks from the spout base rather than the tip, redo the O-ring or silicone seal instead.
How long does it take to change a bathroom faucet on a tub?
A straightforward spout-and-handle swap takes most people 30 to 60 minutes, plus 24 hours for the silicone caulk to fully cure before a heavy shower. If you run into a stuck spout, corroded threads, or need to replace the cartridge too, budget an extra 30–45 minutes. Valve replacement inside the wall is a different, much longer job.
What’s the best sealant for a tub spout — silicone or plumber’s tape?
Use both, in different spots. Plumber’s (PTFE) tape seals the threaded pipe connection so water doesn’t leak inside the wall, while 100% silicone caulk seals the outside edge where the spout meets the tile so shower spray can’t get behind it. Leave the bottom edge of the spout un-caulked so any hidden leak has a path to escape where you’ll notice it.
Author note: This guide was written by the Arcora fixture team, drawing on hands-on installation and testing of tub spouts, cartridges, and trim kits across dozens of valve brands. We’ve replaced enough stuck spouts to know exactly where DIYers get tripped up — and where the job genuinely needs a pro.
About Arcora: Arcorafaucet designs and manufactures faucets, shower systems, and bathroom fixtures built to last. Our tub and shower components are engineered from solid, corrosion-resistant materials and independently tested to meet cUPC and ANSI/NSF flow and durability standards, and our fixtures are backed by a manufacturer’s warranty so the part you install today keeps performing for years.