Getting the tub spout measurement right is the single thing that decides whether your new spout snaps on flush against the wall or leaves you with a wobbly, leaky, gapped mess. The good news: there are really only two or three numbers you need, and you can capture all of them with a tape measure, a flashlight, and five minutes — no plumber required. Below I’ll walk you through exactly what to measure, the difference between slip-on and threaded spouts, and the small mistakes that send people back to the hardware store twice.
I’ve fitted and replaced hundreds of tub spouts across rental units, new construction, and 40-year-old homes, and the failure pattern is almost always the same: people buy a spout based on how it looks instead of how it connects. Let’s fix that.
What Exactly Do I Measure on a Tub Spout — and Why Does It Matter?
You measure two things: the connection length (how far the pipe or stub-out sticks out of the wall) and the connection type (slip-on vs. threaded). Those two facts determine compatibility — the spout’s overall length, shape, and finish are purely cosmetic and won’t cause a leak.
Here’s why connection length matters so much. A tub spout has to do two jobs at once: cover the hole in your wall cleanly, and seal tightly to the water supply so nothing weeps behind the tile. If your measurement is even half an inch off, you either can’t tighten the spout fully (hello, drips) or you bottom it out before it sits flush (hello, ugly gap). The spout’s “reach” — how far it juts over the tub — is a styling choice. The connection measurement is the engineering.
So before anything else, pull the old spout if you can and look underneath. You’re trying to answer one question: is this thing held on by a little set screw, or does it thread onto a pipe?
How Do I Know If I Have a Slip-On or Threaded Tub Spout?
Look underneath the spout near the wall: if you see a small Allen-key (hex) set screw, you have a slip-on spout that slides over a 1/2-inch copper pipe. If there’s no screw, it’s a threaded spout that twists onto a threaded pipe nipple. This is the most important thing to identify, because each type is measured completely differently.
Slip-on (set-screw) spouts slide over a bare copper or PEX stub-out and clamp down with a tiny hex screw underneath. What matters here is the length of the exposed pipe coming out of the wall — typically the spout needs a stub-out somewhere between 2-3/4″ and 4″ long, and the spout’s internal “stop” has to reach it.
Threaded spouts screw onto a galvanized or brass pipe nipple sticking out of the wall. Here you care about two numbers: the nipple length and the thread size. Almost every residential tub uses 1/2″ NPT threads, but the nipple length varies a lot, and that length is what makes the spout sit flush or float off the wall.
One quick gut check: grab the old spout and twist it counterclockwise (after loosening any set screw). If it spins off, threaded. If it won’t budge until you loosen a screw and then it pulls straight off, slip-on.
How Do I Measure a Slip-On Tub Spout Correctly?
For a slip-on spout, measure the length of the copper or PEX stub-out from the finished wall surface to the very end of the pipe — that exposed length needs to fall within the spout’s listed range, usually around 2-3/4″ to 4″. Then measure the inside diameter of the spout’s opening to confirm it matches a 1/2″ pipe (the most common size).
Step by step:
- Remove the old spout. Loosen the set screw underneath with a hex/Allen wrench (usually 1/8″ or 3/32″), then pull the spout straight off the pipe — don’t twist.
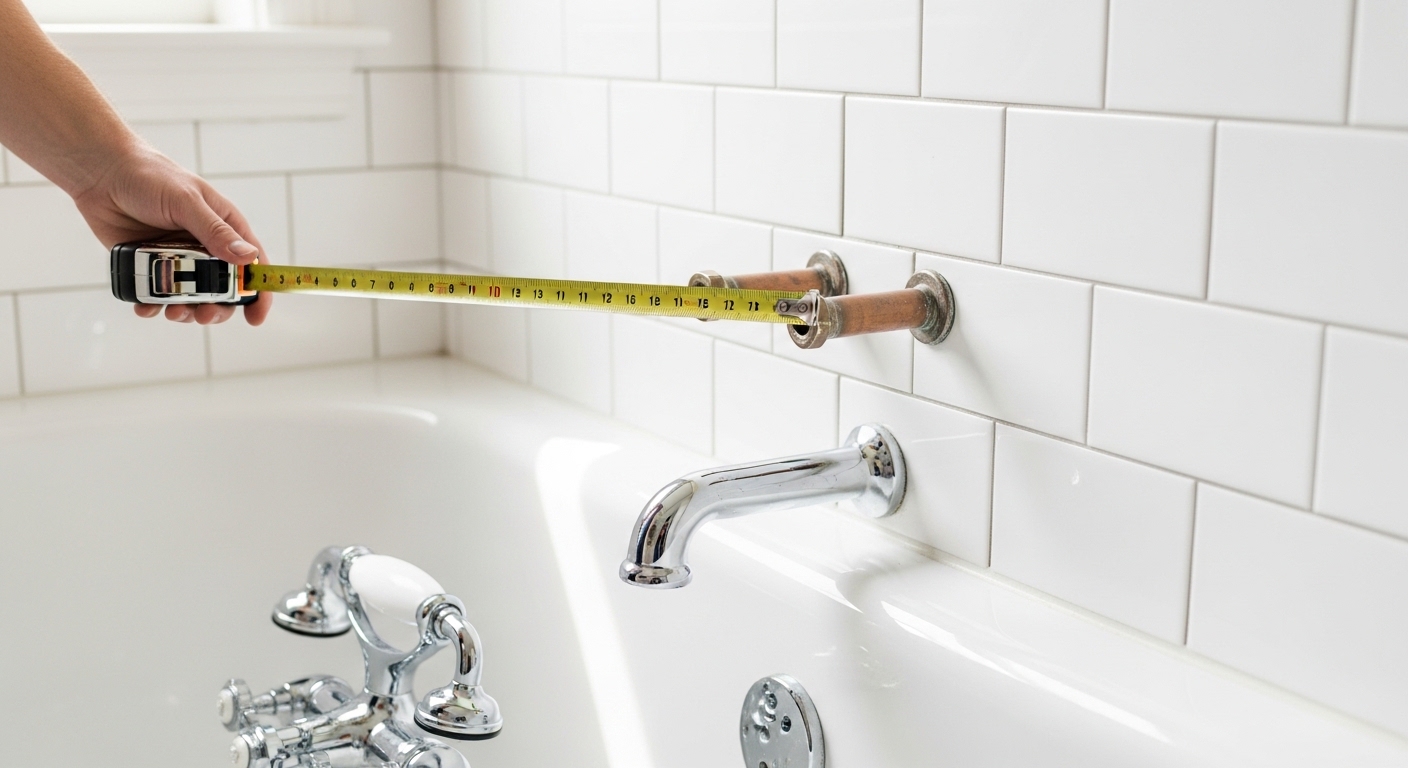
- Measure the stub-out length. Hold your tape against the finished wall (the tile or surround face) and measure to the tip of the copper pipe. Write this number down — this is your critical dimension.
- Check the pipe diameter. Slip-on spouts are built for 1/2″ nominal copper (about 5/8″ actual outside diameter). Confirm yours matches.
- Note the wall gap. Measure from the wall to where you want the spout’s back face to sit — this confirms the spout body is long enough to cover the hole cleanly.
The number-one slip-on mistake: buying a spout whose internal channel is shorter than your stub-out. If the pipe is too long, the spout bottoms out and stands proud of the wall; too short and the set screw has nothing solid to grab. Match the range on the box to your measured stub-out and you’re golden.
How Do I Measure a Threaded Tub Spout Correctly?
For a threaded spout, measure the pipe nipple length from the wall to the end of the threads, and confirm the thread size (1/2″ NPT in nearly all homes). Then measure the depth of the threaded socket inside the spout so you know how far it can screw on before it seats against the wall.
The tricky part with threaded spouts is that the spout has to make two things happen simultaneously: thread tight enough to seal, and end up rotated so the spout points straight down. If the nipple is the wrong length, the spout either seals while pointing sideways or points down while still loose. That’s where plumber’s tape, a properly sized nipple, and sometimes a spacer come in.
Capture these three numbers for a threaded setup:
- Nipple length: from the finished wall to the end of the threaded pipe. Common nipple lengths run 4″ to 6″, but measure yours — don’t assume.
- Thread size: 1/2″ NPT is standard for tubs; 3/4″ exists but is rare in residential bathrooms.
- Spout socket depth: how deep the threaded hole inside the new spout goes, which tells you how much nipple it can swallow.
If you’re replacing a threaded spout and the new one points off-center when tight, you don’t re-cut the nipple — you adjust with thread tape wraps or a thin sealing washer. We’ll cover that in the FAQ.
Slip-On vs. Threaded vs. Universal: Which Connection Should I Buy?
If you want the easiest possible swap, buy a universal/combo spout that ships with adapters for both slip-on and threaded connections — it covers the widest range of stub-out lengths and removes the guesswork. Choose a dedicated slip-on or threaded spout only when you’ve confirmed your exact connection and want a cleaner, lower-profile fit.
| Spout Type | How It Attaches | Key Measurement | Best For | Difficulty |
|---|---|---|---|---|
| Slip-on (set screw) | Slides over copper/PEX stub-out, clamps with hex screw | Stub-out length (≈2¾”–4″) | Modern homes with bare copper stub-outs | Easy |
| Threaded | Twists onto 1/2″ NPT pipe nipple | Nipple length + thread size | Older homes, galvanized/brass nipples | Moderate |
| Universal / combo | Ships with both adapters | Both — adapter covers a range | Anyone unsure of their connection | Easiest |
| Front-end / telescoping | Adjustable internal slide for variable stub-out | Adjustable range (often 2½”–6″) | Odd or non-standard stub-out lengths | Easy–Moderate |
For most DIYers replacing a spout for the first time, a quality universal spout is the safe bet — it’s forgiving of a measurement that’s slightly off and almost always installs in under 15 minutes. If you’ve measured confidently and want a specific finish or a sleeker low-profile look, a dedicated slip-on or threaded model will sit a touch cleaner against the wall.
What’s the Standard Tub Spout Height and Placement in a Bathroom?
A standard tub spout sits about 4″ above the tub deck (the rim of the tub) and is centered over the drain end, though codes allow some variation. The spout must always be above the tub’s overflow/flood level to prevent back-siphoning, and the air gap between the spout outlet and the highest possible water level should be at least 1″.
If you’re doing new construction or a full remodel rather than a simple swap, the rough-in plumbing behind the wall matters just as much as the spout itself. The pipe location, valve height, and stub-out projection all need to be set before the tile goes up. For the behind-the-wall numbers — valve height, supply spacing, and stub-out depth — see our detailed guide on the correct tub shower valve rough-in dimensions for a standard bathroom, which pairs directly with the spout measurements covered here.
A few placement rules worth knowing:
- Height above tub: roughly 4″ from the tub deck to the underside of the spout, so a bucket or hand fits comfortably underneath.
- Horizontal centering: the spout typically lines up with the drain, not the center of the tub.
- Air gap: never let the spout outlet sit at or below the tub’s overflow line — that’s a cross-connection hazard most plumbing codes prohibit.
- Reach over the tub: the spout outlet should clear the inside edge of the tub so water lands in the basin, not on the rim.
What Goes Wrong When the Tub Spout Measurement Is Off?
When the tub spout measurement is wrong, you get one of three problems: a visible gap between the spout and the wall, a constant drip from the spout that won’t stop, or a spout that won’t tighten and spins loose. Each one traces back to a mismatch between the stub-out/nipple length and the spout’s internal stop.
Here’s how to read the symptom:
- Gap at the wall: your stub-out or nipple is too long, so the spout bottoms out before it reaches the wall. Solution: a shorter spout, a deeper-socket spout, or a shorter nipple.
- Spout drips constantly: the seal isn’t seating — often a slip-on spout’s internal O-ring isn’t reaching the pipe, or a threaded spout isn’t tightening fully. This can also be a worn diverter, which is a separate issue.
- Spout spins or wobbles: set screw has nothing to grip (stub-out too short) or threads aren’t engaging.
If your spout looks crooked or sits at an angle even though the measurement seems right, the nipple itself may be bent or installed off-square. We cover that exact scenario — and whether it’s worth fixing versus replacing — in our guide on what to do when your tub spout is bent or crooked. And if your new spout is sealed tight but you’re still seeing water, the culprit is usually the diverter or valve, not the measurement — our walkthrough on a tub spout leaking hot water when the water is off diagnoses that one. For general drip troubleshooting at the tub, the quick and easy bathtub faucet leak fix is a good companion read.
FAQ
What size pipe does a tub spout connect to?
Almost all residential tub spouts connect to a 1/2-inch pipe — either a 1/2″ copper/PEX stub-out for slip-on spouts or a 1/2″ NPT threaded nipple for threaded spouts. A 3/4″ connection exists but is uncommon in homes. When in doubt, 1/2″ is the safe assumption, and most universal spouts are built around it.
How long should the copper stub-out be for a slip-on tub spout?
For most slip-on spouts, the exposed copper stub-out should measure roughly 2-3/4″ to 4″ from the finished wall to the tip of the pipe. Check the specific spout’s spec range on the box. If your stub-out is too long, choose a spout with a deeper internal channel or a telescoping/adjustable model; if it’s too short, the set screw won’t grip securely.
My new threaded spout points sideways when tight — how do I fix it?
Don’t force it past tight. Back the spout off, add two to three extra wraps of plumber’s (PTFE) thread tape on the nipple, or add a thin sealing washer to take up the gap — this lets the spout seat fully while pointing straight down. If it still won’t align, the nipple length is wrong and should be swapped for a slightly shorter or longer one. Never overtighten to “aim” a spout; that cracks the spout or strips the threads.
Can I replace a tub spout with a different length or style?
Yes — the spout’s reach, height, and finish are cosmetic and you can change them freely, as long as the connection matches. A slip-on spout needs a slip-on connection and a stub-out within its range; a threaded spout needs a matching nipple. You can go from a short spout to a long, gooseneck-style one without touching the plumbing, provided the connection type and measurement line up.
Do I need to measure if I’m buying a universal tub spout?
You should still measure your stub-out or nipple length, even for a universal spout. Universal models cover a wide range, but they aren’t infinite — confirming your connection type and length guarantees the included adapter will reach and seal. A two-minute measurement prevents a return trip. Measure first, then buy.
How much air gap do I need between the tub spout and the water?
You need at least a 1-inch air gap between the spout outlet and the highest possible water level (the tub’s flood/overflow line). This prevents dirty bath water from being siphoned back into your supply if pressure drops. It’s a plumbing code requirement, which is why tub spouts are mounted above the tub rim rather than near the bottom.
The Bottom Line on Measuring Your Tub Spout
Nail two numbers — the connection length and the connection type — and a tub spout swap goes from intimidating to a 15-minute job. Identify whether you’re slip-on or threaded, measure the stub-out or nipple from the finished wall, confirm 1/2″ sizing, and you can buy with total confidence. When you’re unsure, a universal spout with both adapters is the forgiving choice that fits the widest range of bathrooms.
About the author: This guide was written by the Arcora Faucet product team, drawing on hands-on installation and testing of tub spouts, diverters, and shower valves across slip-on and threaded configurations. We build and pressure-test our fixtures to standard residential plumbing specs (1/2″ NPT and 1/2″ copper connections), and Arcora bathroom fixtures are backed by a manufacturer warranty and built to meet common North American plumbing standards. When we cite a measurement, it’s the same number we use on our own bench — not a guess.
Arcora is a dedicated faucet and bathroom-fixture brand focused on durable, well-engineered tub spouts, shower systems, and kitchen and bath faucets. We test fit and finish before a product ships so the spec on the page matches the part in the box.