 ARCORA FAUCETS
If you’ve been searching how to install shower head handle setups — meaning the handheld shower “wand” with its hose and bracket — the good news is this is one of the easiest plumbing upgrades in the whole bathroom. There’s no wall to open, no valve to touch, and in most cases no tools beyond an adjustable wrench and a roll of plumber’s tape. A handheld shower head handle threads onto the same shower arm your old fixed head used, so the connection point is already there and waiting. Below I’ll walk you through exactly what to unscrew, what to wrap, and how to avoid the two mistakes that cause 90% of the drips people complain about afterward.
I’ve installed and swapped dozens of these — on tile walls, fiberglass surrounds, and clawfoot tubs — and the process barely changes. Let’s get you from “leaky old head” to “adjustable handheld with a mount” without a service call.
What exactly is a “shower head handle,” and what parts come in the box?
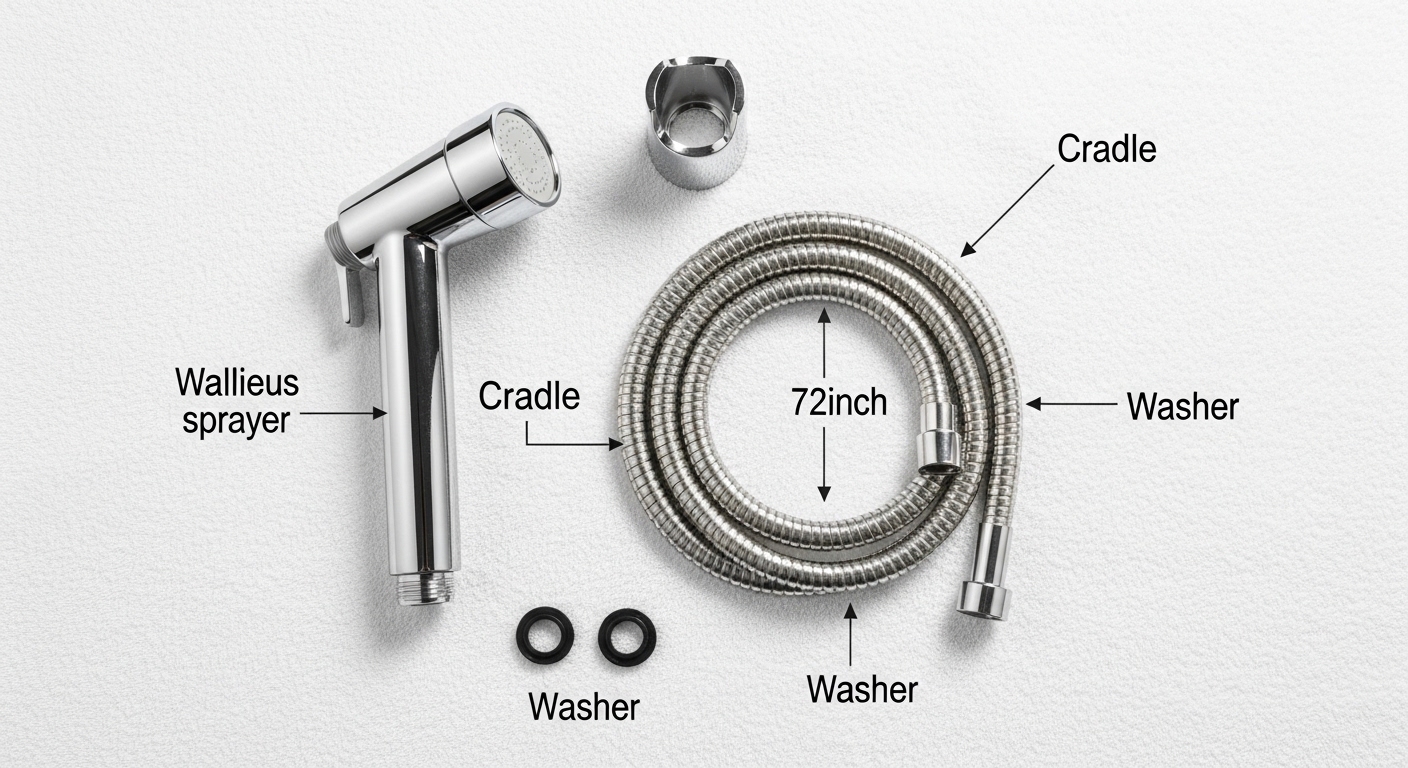
A “shower head handle” is the handheld shower wand — the part you hold and spray with — and it never installs alone. It comes as a small kit: the handheld head, a flexible metal or PVC-lined hose, a mounting bracket or holder, and usually a rubber washer or two. Understanding the parts is half the battle, because each one has its own threaded connection.
Here’s what’s typically in the box, and where each piece goes:
- The handheld head (the “handle”): the sprayer you hold; it screws onto one end of the hose.
- The flexible hose: usually 60–72 inches of stainless-braided or brass-nut hose. One end goes to the shower arm, the other to the head.
- The wall bracket or holder: either a simple hook-style cradle that screws right onto the shower arm, or an adhesive/drilled holder mounted separately on the wall.
- Rubber washers (gaskets): small flat or cone-shaped rubber rings that sit inside each swivel nut to seal the connection — do not lose these.
- Sometimes a diverter or wall supply elbow: only on fancier bar-mounted systems.
The key connections you’ll make are all threaded and hand-tightened. The standard thread size for a US shower arm is 1/2-inch NPT, and virtually every handheld hose is built to match, so you rarely have to worry about compatibility. If you’re ever unsure whether a fitting will match, our guide on the faucet adapter homeowners actually need explains how thread adapters work — the same logic applies to shower connections.
How do you remove the old shower head before installing the handle?
Twist the old shower head counterclockwise by hand; if it won’t budge, grip the shower arm with one wrench and turn the head with another, then peel off the old plumber’s tape from the arm threads. That’s the whole removal — it should take under two minutes.
Step by step:
- Protect the finish. Wrap a rag or a strip of masking tape around the shower arm and the head nut so the wrench jaws don’t scratch the chrome or brushed nickel.
- Hold the arm steady. The shower arm is the curved pipe coming out of the wall. If you crank on the head without bracing the arm, you can loosen the arm inside the wall — which turns a 15-minute job into a real repair. Grip the arm base with slip-joint pliers or a second wrench.
- Turn the head counterclockwise. Lefty-loosey. Old heads often free up with just hand pressure once the wrench cracks them loose.
- Clean the threads. Peel and scrub off every bit of old white or pink plumber’s tape and any crusty mineral buildup. The new tape needs clean, bare threads to seal properly.
If your shower arm looks corroded, bent, or crooked once the head is off, deal with that now rather than fighting a leak later. A tilted arm throws off how the handheld hangs — the same principle we cover in our piece on whether to fix or replace a bent tub spout. A quick swap of the shower arm is cheap insurance.
Do you need plumber’s tape to install a handheld shower head?
Yes — use plumber’s tape (PTFE thread-seal tape) on the shower arm threads, but do NOT use it on the hose swivel nuts that already contain a rubber washer. Tape seals metal-on-metal threads; rubber washers seal the swivel connections, and doubling up actually causes leaks.
This is the single most misunderstood part of the job, so let me make it crystal clear:
| Connection point | Use plumber’s tape? | Why |
|---|---|---|
| Shower arm threads (where the hose or bracket screws on) | Yes — 3 to 4 wraps clockwise | Tapered metal threads with no washer; tape fills the gaps and seals. |
| Hose swivel nut → shower arm (if it has a rubber washer) | No | The rubber washer already seals it; tape prevents the washer from seating flat. |
| Hose → handheld head connection | No | Built-in rubber washer inside the swivel nut does the sealing. |
| Threaded holder onto shower arm (no washer) | Yes — 3 to 4 wraps | Same as the arm: bare metal threads need tape. |
When you wrap, go clockwise (the same direction you’ll screw the fitting on) so the tape tightens instead of unraveling. Three to four snug wraps is plenty — a huge wad of tape doesn’t seal better and can crack the fitting. Stretch the tape slightly as you wrap so it hugs the threads.
How do you actually attach the hose, head, and bracket — step by step?
Screw the hose’s washered end onto the shower arm hand-tight plus a quarter turn with a wrench, attach the handheld head to the other end of the hose, then mount the cradle — either the type that slips over the shower arm or a wall holder you stick or screw on. The whole assembly is hand-driven; you only need a wrench for a final snug quarter-turn.
Here’s the full sequence once removal and taping are done:
- Mount the bracket first (if it’s the shower-arm type). Many handheld kits use a cradle that threads onto the shower arm — you install it exactly where the old head was. Wrap the arm threads with tape, screw on the cradle/mount, and align it so the hook faces forward.
- Connect the hose to the shower arm or mount. The larger swivel nut on the hose usually goes up top. Check that the rubber washer is seated inside the nut, then hand-thread it clockwise onto the arm. Snug it with a wrench about a quarter turn past hand-tight — no gorilla force.
- Connect the head to the hose. The smaller (cone) end of the hose threads onto the handheld head. Confirm the washer is inside, hand-tighten, then a light quarter-turn with the wrench.
- Set the head in the cradle. Hang the wand and make sure it sits securely and the hose isn’t kinked or twisted behind it.
If your kit uses a separate wall-mounted holder or a slide bar instead of an arm-mounted cradle, you’ll either use strong adhesive or drill into the tile. Adhesive holders are far less messy — but only if they actually stay put. We put that exact question to the test in our review of whether a handheld shower head holder adhesive really holds up, which is worth a read before you decide between sticking and drilling.
What if I want to keep my fixed shower head AND add a handheld?
Install a shower arm diverter. It’s a small brass fitting that screws onto the shower arm and offers two outlets — one for your existing fixed head, one for the handheld hose — with a lever or pull-tab to switch between them. You install it exactly like a bracket: tape the arm threads, screw on the diverter, then attach both heads to their respective ports. No wall work required.
How do you test for leaks after installing the shower head handle?
Turn the water on slowly to full hot and cold, then run your fingertips around every threaded joint for 30–60 seconds — any bead of water means that connection needs a slight tightening or a re-taped thread. Do this before you consider the job done.
A quick leak-check routine:
- Run the water full blast and let pressure build for a minute — leaks show up under pressure, not a trickle.
- Feel, don’t just look. Wrap a dry paper towel around each joint; a wet spot shows exactly where it’s weeping.
- Drips at the arm/hose joint? Snug it another eighth-turn. Still leaking? Back it off, add one more wrap of tape (bare-thread joints only), and retry.
- Drips at a washer joint? Don’t add tape. Unscrew it, confirm the rubber washer is seated flat and not pinched or missing, and re-tighten.
If water sprays weakly after install rather than leaking, the culprit is often a clogged flow restrictor or aerator screen in the new head, or low household pressure. Our guides on why tap water pressure suddenly gets worse and cleaning versus replacing faucet aerator mesh apply directly — the same debris that clogs a faucet clogs a shower head.
What tools and supplies do you need, and how long does it take?
You need an adjustable wrench, plumber’s (PTFE) tape, and a rag — that’s it for a basic handheld swap. Budget about 15 minutes for an arm-mounted cradle kit, or 30–45 minutes if you’re drilling a wall holder or slide bar into tile.
| Install type | Tools needed | Time | Difficulty |
|---|---|---|---|
| Handheld on existing shower arm (cradle mount) | Adjustable wrench, PTFE tape, rag | ~15 min | Very easy |
| Handheld + fixed head via diverter | Wrench, PTFE tape, rag | ~20 min | Easy |
| Adhesive wall holder + handheld | Wrench, PTFE tape, rubbing alcohol, adhesive mount | ~20 min + 24 hr cure | Easy |
| Slide bar mounted into tile | Drill, tile/masonry bit, anchors, level, wrench, tape | 30–45 min | Moderate |
A few pro habits that save headaches:
- Keep the old washers as spares — they’re a common size and handy when a future leak appears.
- Don’t over-tighten anything. Cracked plastic swivel nuts and stripped brass are almost always from too much wrench, not too little.
- If drilling tile, mark and center-punch first, drill on low speed, and never overtighten screws into anchors or you’ll crack the tile.
Can you install a shower head handle without any tools at all?
Often yes — many modern handheld kits are designed for hand-tight installation, so if the old head comes off by hand and your kit uses washered swivel nuts, you can do the whole thing tool-free. The wrench is only insurance for a stuck old head and that final quarter-turn snug. Plumber’s tape, however, is still strongly recommended on any bare-metal arm thread even if you skip the wrench.
Common mistakes people make (and how to avoid them)
The biggest install mistakes are over-tightening plastic nuts, taping washered joints, and forgetting to brace the shower arm — each one causes a leak or damage that’s easy to prevent. Here’s a fast rundown so you sidestep them:
- Cranking too hard. Hand-tight plus a quarter turn is the target. Chrome-plated plastic nuts strip and crack fast.
- Taping the wrong joints. Tape only bare-metal threads; never tape a connection that has a rubber washer.
- Ignoring the washer. A missing or pinched washer is the number-one cause of a dripping swivel. Always look before you tighten.
- Not bracing the arm. Twisting the head without holding the arm can loosen the pipe inside the wall and start a hidden leak. If you’re replacing a whole shower valve, that’s a bigger job — see how it’s done in new construction in our step-by-step shower faucet install guide.
- Skipping the leak test. Two minutes of checking beats a slow drip rotting your wall for months.
FAQ
Do I need to turn off the water to install a handheld shower head?
No, you don’t need to shut off the main water supply for a standard handheld swap, because you’re only working on the shower arm downstream of the valve — as long as the shower control is off, no water flows to the arm. Just make sure the shower handle is fully closed before you unscrew the old head.
What size are shower head handle threads?
Standard US shower arms and handheld hoses both use 1/2-inch NPT threads, so nearly every handheld kit sold in North America screws directly onto an existing shower arm with no adapter. If you have an older or imported fixture with a different thread, a simple brass adapter solves it.
Why is my new handheld shower head leaking at the hose connection?
A leak at the hose swivel almost always means the rubber washer is missing, upside down, or pinched — not that you need more tape. Unscrew the nut, seat a flat washer squarely inside it, and hand-tighten plus a light quarter-turn. Only bare-metal threads (like the shower arm) get plumber’s tape.
Can I install a handheld shower head on a clawfoot or freestanding tub?
Yes, but those use a dedicated tub-mounted faucet or wall supply elbows rather than a wall shower arm, so you connect the handheld hose to the tub filler’s handheld port. The sealing principle is identical — washers on swivel nuts, tape on bare threads. Our overview of a freestanding tub faucet setup shows how those handheld connections are laid out.
How high should I mount the handheld shower head holder?
Mount an arm-mounted cradle wherever your existing shower arm sits (typically 72–80 inches off the floor), and mount a separate wall holder or the top of a slide bar around 72 inches or at the tallest user’s comfortable reach. For a slide bar, position it so the whole bar is reachable both standing and seated if anyone showers sitting down.
Is installing a shower head handle safe to do myself, or should I call a plumber?
It’s genuinely a DIY-safe job for almost anyone because it involves no pipe cutting, soldering, or opening the wall — you’re only screwing fittings onto an existing shower arm. Call a pro only if the shower arm itself is corroded into the wall, spins freely (a sign the drop-ear elbow is loose), or you’re relocating plumbing.
About the author: This guide was written by the arcorafaucet product team, drawing on hands-on installation of handheld and fixed shower systems across tile, fiberglass, and clawfoot setups. Arcora designs and manufactures faucets, shower systems, and bathroom fixtures engineered to meet US plumbing standards, and our handheld shower heads are pressure- and leak-tested before shipping and backed by a manufacturer’s warranty. When a fixture meets cUPC/NSF-style flow and safety benchmarks, installation like the steps above should seal on the first try — if it doesn’t, the connection, not the hardware, is usually the fix.