 ARCORA FAUCETS
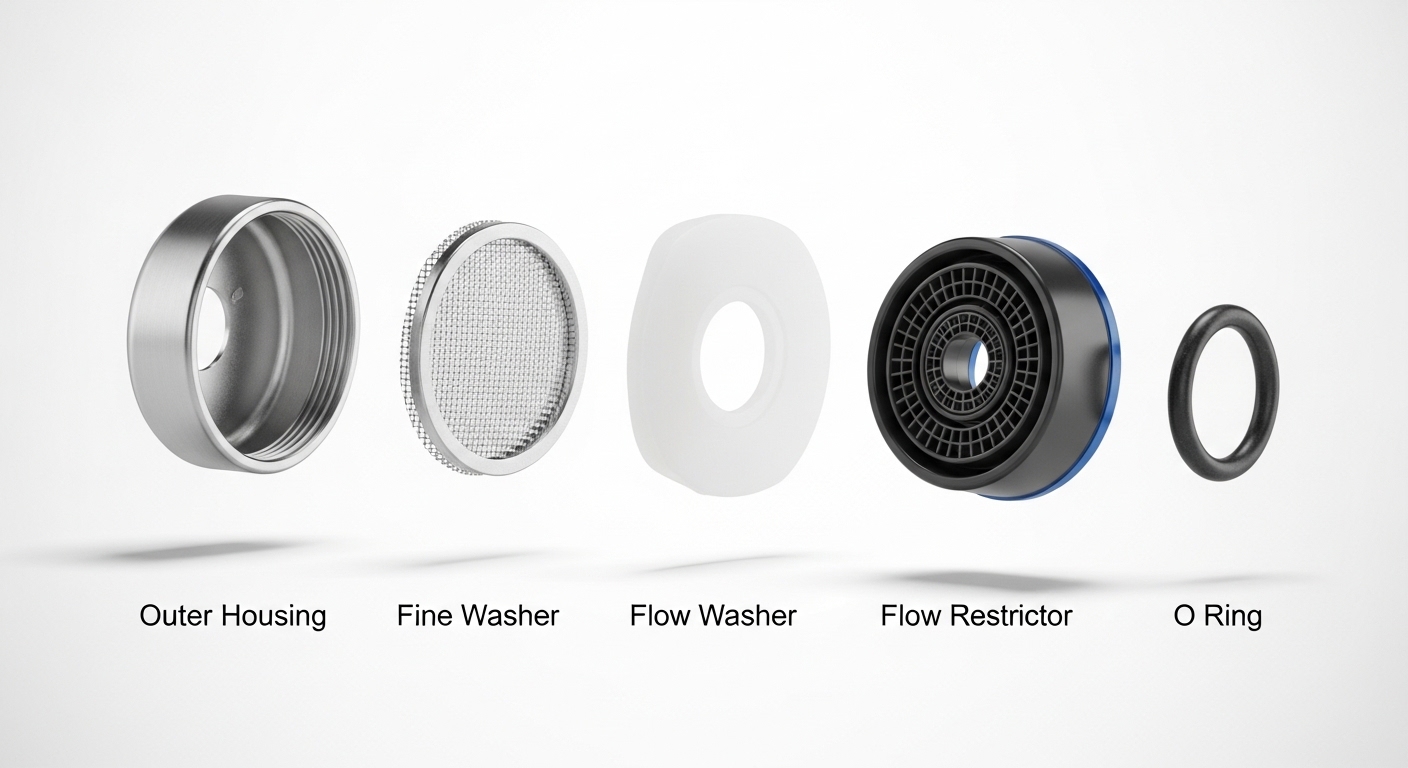
The faucet aerator internal is the working guts of the little tip that screws onto the end of almost every kitchen and bathroom faucet. From the outside you just see a threaded ring; inside that ring sits the actual mechanism — a fine mesh screen, a plastic or rubber flow disc, a flow restrictor, and a sealing O-ring — all stacked together. That internal cartridge is what turns a harsh jet of water into the soft, straight, splash-free stream you actually want. When people search for a “faucet aerator internal,” they’re almost always trying to figure out one of two things: what the parts inside actually are, or which replacement insert they need to buy. This article answers both, plus the practical stuff around cleaning, sizing, and flow rate.
At Arcora, we design and pressure-test the aerators that ship on our kitchen and bathroom faucets to meet standard U.S. flow and thread specs, so we spend a lot of time explaining these tiny parts to customers. Below is the plain-English version of everything we tell them.
What are the internal parts of a faucet aerator, exactly?
A faucet aerator internal is made of four to five stacked components inside the threaded housing: a mesh screen, a flow restrictor, one or two flow washers, a rubber O-ring seal, and sometimes a diffuser plate. Each one has a job, and together they control how your water looks and feels coming out of the tap.
Here’s what each piece does, from the water side to the outlet:
- O-ring (rubber washer): Sits at the top and seals the aerator against the faucet spout so water doesn’t leak from the threads. A cracked O-ring is the #1 cause of a slow drip around the aerator.
- Flow restrictor: A small plastic disc with a precisely sized hole that caps the maximum flow rate — this is the part that makes an aerator “1.5 GPM” or “1.0 GPM.”
- Flow washer / diffuser: Breaks the single stream into many smaller jets and starts pulling in air.
- Mesh screen (the aerator proper): The fine metal or nylon mesh that mixes air into those jets, creating the soft, milky, non-splashing stream and catching grit.
- Housing (the shell): Technically not “internal,” but it’s the threaded body that holds the stack together and screws onto the spout.
The reason the internal matters so much is that air is doing the heavy lifting. A stream without an aerator is loud, splashy, and wastes water. The internal parts blend roughly equal parts air and water so the stream feels full and steady even at a lower actual GPM. That’s why a good aerator can cut water use by 30% or more without you feeling any drop in performance.
Why is my faucet aerator internal making the water sputter or spray sideways?
A sputtering or sideways-spraying faucet almost always means the aerator internal is partially clogged with mineral scale or debris, or a washer inside has shifted. It’s rarely the faucet itself. Unscrew the aerator, and nine times out of ten you’ll find the fix inside.
The usual culprits, in order of how often we see them:
- Hard-water scale on the mesh screen. Calcium and magnesium build a white crust across the screen, blocking some holes and forcing water out of others at odd angles. This is the most common cause of a sideways spray.
- Grit and pipe debris. After plumbing work or a water main flush, sand, rust flakes, or bits of old pipe dope get caught in the screen. New construction faucets are notorious for this.
- A dislodged flow washer. If the internal stack was reassembled out of order or over-tightened, a washer can tilt and disrupt the stream.
- A torn O-ring. This causes leaking around the threads rather than sputtering, but it often shows up at the same time.
Before you buy anything, pull the aerator and rinse the internal parts. Lay them out in the exact order they came out (take a phone photo first), then soak the screen and restrictor in a 50/50 mix of white vinegar and warm water for 20–30 minutes to dissolve the scale. An old toothbrush clears the loosened crust. If you deal with heavy scale regularly, our guide on how to remove hard water stains on a faucet without wrecking the finish covers the same descaling approach for the whole fixture.
Can you clean the internal parts, or should you just replace the aerator?
Clean first — replace only if cleaning doesn’t restore a full, even stream or if a part is cracked. The internal parts of an aerator are cheap enough that replacement is never a big expense, but a 20-minute vinegar soak fixes most sputtering problems for free.
Clean the internal when: the stream is weak or spraying but the parts look intact after descaling; the faucet is only a year or two old; or you just did plumbing work and want to flush out debris. Replace the internal when: the mesh screen is corroded or torn, the O-ring is cracked or flattened, the flow restrictor is warped, or you’ve cleaned it twice in six months and the problem keeps coming back. Plastic internals in particular get brittle after years of hot water and eventually deserve a fresh insert.
One warning worth repeating: if the aerator itself is seized onto the spout and won’t budge, don’t crank on it with bare pliers — you’ll gouge the finish or crack the housing. We wrote a full step-by-step on faucet aerator removal when it’s stuck that walks through the vinegar-bag trick, the rubber-grip method, and how to use a proper aerator key without scratching anything.
How do I know which faucet aerator internal replacement to buy?
You need to match three things: the thread size and gender, the flow rate (GPM), and the spray style. Get the thread right and the rest is preference — an aerator that doesn’t thread on is useless no matter how good the internal is.
Most residential faucets in the U.S. use one of a handful of standard sizes. Here’s how they break down:
| Aerator type | Thread size | Typical use | How to identify it |
|---|---|---|---|
| Regular male | 15/16″ – 27 | Standard kitchen faucets | Threads on the outside of the housing |
| Regular female | 55/64″ – 27 | Standard kitchen faucets | Threads on the inside of the housing |
| Junior / small male | 13/16″ | Many bathroom faucets | Smaller outside threads |
| Junior / small female | 3/4″ | Bathroom & bar faucets | Smaller inside threads |
| Tom Thumb / cache | Hidden | Modern designer faucets | Recessed, needs a special key to remove |
The quickest way to nail the size: unscrew your old aerator and take it to the hardware store, or measure the outside diameter of the threads with calipers. Male aerators thread on the outside and sit slightly recessed into the spout; female aerators have their threads inside and cover the spout tip. If you can see threads on the faucet spout itself, you need a female aerator; if the spout is smooth inside, you need a male one. A cheap universal aerator kit includes both a male and female adapter and several washers, which covers nearly every standard faucet.
What flow rate should the internal restrictor be — 1.0, 1.5, or 2.2 GPM?
Match the flow rate to the fixture: 1.0–1.5 GPM for a bathroom faucet, 1.5–1.8 GPM for a kitchen faucet, and up to 2.2 GPM only if you fill big pots often and your water pressure is low. The flow restrictor inside the aerator is what sets this number, and picking the right one is the single biggest factor in how the faucet feels.
GPM stands for gallons per minute. Federal maximums cap bathroom faucets and many kitchen faucets, and states like California go stricter (1.2 GPM for lavatory faucets, 1.8 GPM for kitchen). Here’s the practical translation:
- 1.0 GPM: Great for bathroom sinks — plenty for washing hands and brushing teeth, and it saves the most water. Can feel weak if your home has low pressure.
- 1.5 GPM: The sweet spot for most bathroom and light kitchen use. Feels full, still efficient.
- 1.8 GPM: A good all-around kitchen number — enough oomph to rinse dishes and fill a pot at a reasonable speed.
- 2.2 GPM: Maximum most standard aerators go. Choose it only for heavy kitchen tasks or if low household pressure is making everything feel sluggish.
Here’s the catch a lot of people miss: if your water pressure is already low, dropping to a 1.0 GPM restrictor can make the faucet feel useless. In that case, keep a 1.5 or higher restrictor, or remove the restrictor disc entirely (leaving the aerator screen in place) to prioritize feel over savings. If your whole house feels underpowered, the aerator may be a symptom rather than the cause — the same low-pressure logic we cover for showers in how to fix low pressure in a shower head applies to faucets too. And if you’re specifically trying to cut water use in the kitchen, what’s considered a low-flow kitchen faucet breaks down the GPM tradeoffs in more depth.
How do you replace a faucet aerator internal, step by step?
Replacing the internal takes about five minutes with no special tools for standard aerators. Unscrew the housing, swap the internal stack, and thread it back on hand-tight. Here’s the full process.
- Cover the drain. Put in the stopper or lay a rag over it so no small parts fall down the sink.
- Unscrew the aerator. Turn it counterclockwise (as you look up at it) by hand. If it’s tight, wrap the housing in a rubber band or cloth and use pliers gently — never grip the visible spout finish directly.
- Note the order. Push the internal stack out and lay the parts in sequence. Photograph them. Order matters — reversed washers cause spraying.
- Inspect and swap. Replace the mesh screen, restrictor, washers, and O-ring with the matching new parts, or drop in a pre-assembled replacement insert.
- Reassemble in the same order and seat the O-ring flat so it seals.
- Thread it back on hand-tight, then snug it a quarter-turn with a cloth-wrapped grip. Over-tightening crushes the O-ring and causes leaks.
- Test. Run the water. The stream should be full, straight, and slightly aerated with no side-spray. If it leaks at the threads, the O-ring isn’t seated — take it apart and reseat it.
That’s it. No plumber, no shutting off the water supply. The only faucets that need a special tool are the recessed “cache” or Tom Thumb style used on some modern designer taps — those require a plastic aerator key that usually ships with the faucet.
How often should you clean or replace the internal parts?
Clean the aerator internal every 3–6 months in hard-water areas and once a year in soft-water areas; replace the internal parts every 2–4 years or whenever cleaning stops restoring full flow. It’s the cheapest maintenance in your whole plumbing system.
If you live somewhere with very hard water (a lot of the American Southwest and Midwest), scale builds fast and you’ll notice flow dropping within a few months. A quick vinegar soak keeps it clear. Softer water areas can go a year or more. The parts themselves are inexpensive — a full replacement insert or a universal aerator runs just a few dollars — so there’s no reason to limp along with a sputtering faucet. Keeping the internal clean also protects the rest of the faucet: a clogged aerator raises back-pressure and can stress the cartridge and seals upstream over time.
FAQ
Is the aerator internal the same as the whole aerator?
No. The “aerator” usually refers to the whole assembly, including the threaded outer housing. The “internal” specifically means the stack of working parts inside it — the screen, restrictor, washers, and O-ring. You can often replace just the internal insert and reuse the housing, or replace the entire aerator as one unit. For most people, buying a complete replacement aerator is the simplest route.
Can I remove the flow restrictor to get more pressure?
Yes, you can pop out the plastic restrictor disc to increase flow, and many people do this when household water pressure is low. Keep the aerator screen and washers in place, though — removing everything gives you a loud, splashy jet. Just know that pulling the restrictor raises your water use and may put the faucet above local flow-rate codes, which matters if you’re in a state with strict efficiency rules like California.
Why is my new aerator still spraying sideways?
A brand-new aerator that sprays sideways almost always has the internal washers stacked in the wrong order, or a bit of grit got trapped during install. Unscrew it, take the internal parts out, rinse them, and reassemble in the correct sequence with the O-ring seated flat. If it still sprays, the thread size may be slightly mismatched, letting the housing sit crooked — double-check male vs. female and the exact size.
Are faucet aerator internals universal, or brand-specific?
The internal components are largely standardized around common thread sizes, so a universal aerator or insert fits the majority of U.S. faucets. The exceptions are recessed “cache” aerators on some premium designer faucets, which use a hidden housing and a brand-specific key. When in doubt, unscrew your existing one and match the thread size — that’s what determines fit, not the brand.
Will a new aerator internal actually save me money?
Yes, modestly but reliably. Swapping a 2.2 GPM aerator for a 1.5 GPM one on a frequently used faucet can cut that tap’s water use by roughly a third, which adds up on both your water and water-heating bills over a year. The part costs only a few dollars, so it typically pays for itself within the first couple of months of use.
Does a clogged aerator hurt the rest of the faucet?
Over time, yes. A clogged aerator internal increases back-pressure inside the faucet body, which can accelerate wear on the cartridge and internal seals. It also masks other issues — you might blame the faucet for “low pressure” when a two-minute aerator cleaning would have fixed it. Regular descaling keeps both the aerator and the faucet mechanism healthy.
The bottom line
The faucet aerator internal is small, cheap, and easy to overlook — but it controls how your water looks, feels, and flows, and it’s the first thing to check when a faucet starts acting up. Clean it before you replace it, match the thread size and GPM when you do buy a new one, and hand-tighten so you don’t crush the O-ring. For a few dollars and five minutes, you get back a full, quiet, splash-free stream.
Author note: This guide was written by the Arcora fixtures team, drawing on our own aerator design and bench-testing. Arcora manufactures kitchen and bathroom faucets built to standard U.S. thread and flow specifications, and our aerators are pressure- and flow-tested to meet WaterSense-aligned GPM ratings. Our faucets are backed by a limited lifetime warranty on the finish and function. Always confirm your local plumbing flow-rate codes before removing or modifying a flow restrictor.